Let's Build: PrettyPrint, a Better CLI Output
While developing a CLI tool, it is a common practice to print values to the console. For example, your tool might wrap a few HTTP requests, and print the response to the console. When this response is a pure JSON object, you might print it as is. But often, you will have a Codable model that the response is decoded into, and you want to print that object instead.
Last week I faced this exact scenario, and when printing the object to the console, I got the following output:

Quite hard to read, right?
One option would be to print the original response as a JSON string, or to encode the object into a pretty-printed JSON with JSONEncoder’s outputFormatting set to .prettyPrinted. But I didn’t want the curly braces, commas and quotes, so this option was out.
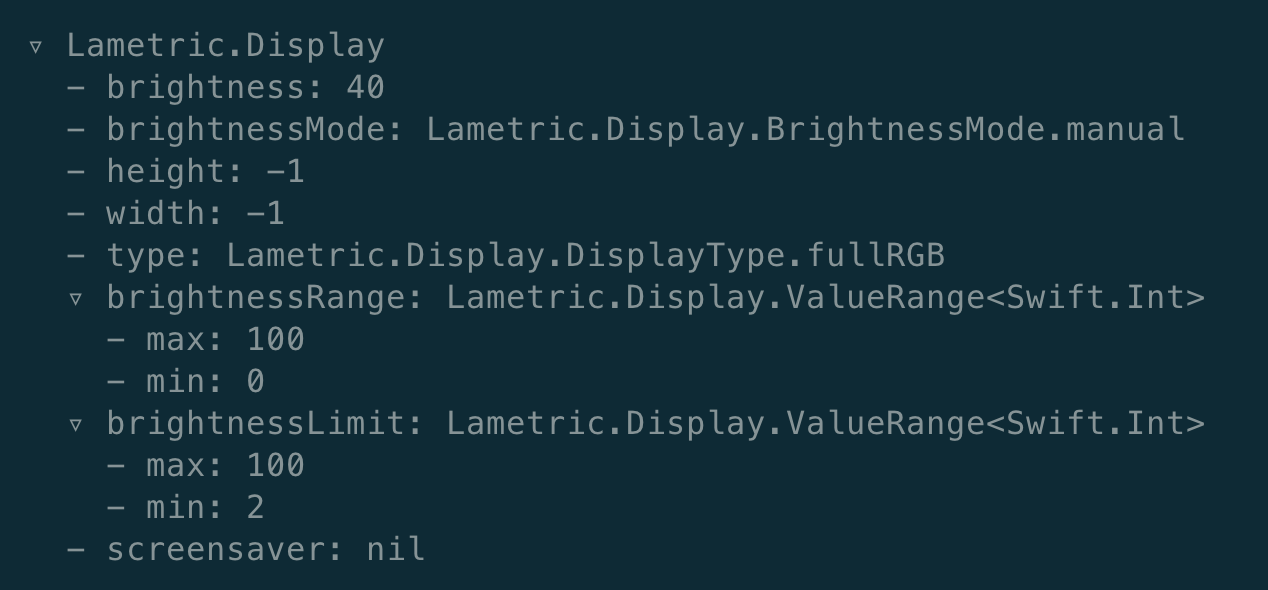
Another option would be to use the dump function, which prints a value in a tree-like format:


I wanted something similar to dump’s output, but with more control and customization, such as printing the property names in bold. I thought it could be a fun exercise to implement something similar, turning it into a Swift package. With this, a new post in the Let’s Build series and a new package were born: PrettyPrint.
It contains no dependencies, and allows you to print any Swift types in a tree-like format. This post will explore parts of PrettyPrint’s implementation, and how you can use it to improve the readability of your CLI tools.
API Design
The public API should be as minimal as possible, similar to dump, while also allowing it to be extendable if needed. Ideally, I wanted the functionality to work by calling a single function: a replacement for the regular print function from the standard library:
prettyPrint(something)Before I started writing any lines of code, I felt that the following 3 points were going to be essential to the API design:
- There is only one public function to remember
- Recursion is a core concept, given that nested types are common and indentation is used to represent the levels of nesting
- Using a protocol-based approach will make it easier to support standard types, not only easier, but also consumers can extend the functionality to their own types if needed
With that in mind, I started coding the prettyPrint function.
Implementing PrettyPrint
The Starting Point
Although Swift’s default print seems very simple when calling, the function signature reveals a few things:
// Swift's print:
func print(
    _ items: Any...,
    separator: String = " ",
    terminator: String = "\n"
)
It supports variadic parameters to be printed, and for that reason, a custom separator when there are multiple values. Finally, it supports a custom terminator, which defaults to a newline.
Aiming for something that works instead of something that is a 1 to 1 replacement, I started coding. The first step was to define the function signature. I wanted the type of the value parameter to be printed before its contents, so I started by printing its type:
func prettyPrint(_ value: Any) {
    print(String(describing: type(of: value)) + ":")

    // Print the contents
}
After that, the function needed the real contents of the value. To do so, another method should build the string with the prettified contents of the value, taking into account the indentation level to support nested types:
func prettyContent(_ value: Any, indent: Int) -> String {}The PrettyPrintable Protocol
The basic implementation of the prettyContent function checks if the value conforms to the PrettyPrintable protocol, the core of this package. If so, then it uses the returned string from the pretty() method. Otherwise, it uses the default Mirror-based implementation (more on that in the next sub-section):
public func prettyContent(_ value: Any, indent: Int) -> String {
    let indentation = indentString(count: indent)

    if let printable = value as? PrettyPrintable {
        return indentation + "∙ (printable.pretty())\n"
    }

    // Fallback to Mirror-based implementation. More on this in the next section.
    return MirrorBasedPrintable(value: value, indent: indent).pretty()
}
The PrettyPrintable protocol is defined as follows:
public protocol PrettyPrintable {
    func pretty() -> String

    var isFoundationType: Bool { get }

    var requiresNewline: Bool { get }
}
While the pretty() method is required, the other two properties default to false. When isFoundationType is false, the type name is printed after the property name, making it easier to identify the type of the property. For all the built-in types, isFoundationType is true, so the type name is omitted.
The requiresNewline property is used to control whether a newline is printed after the property name, instead of inlining the pretty-printed contents after the property name.
Supporting All Types with Mirror
To allow printing any type, PrettyPrint uses the Mirror type, from the standard library. It is a powerful type that allows you to inspect, in runtime, the child properties of any type.
This is the type that conforms to the PrettyPrintable protocol:
struct MirrorBasedPrintable: PrettyPrintable {
    let value: Any // The base value
    let indent: Int // The current indentation level

    var isFoundationType: Bool { false }
    var requiresNewline: Bool { true }
}
And inside the pretty() method, it uses the Mirror type to inspect the value. This is a simplified version of the actual implementation:
func pretty() -> String {
    var result = ""

    let mirror = Mirror(reflecting: value)
    mirror.children.forEach {
        // Check if the type should be inlined or not
        // Check if the type name should be printed
        let prefix = ...

        // Use the prettyContent function to get the pretty-printed contents
        result += prefix + prettyContent($0.value, indent: indent + 1) + "\n"
    }

    return result
}
Supporting Foundation Types
Although any type is supported via Mirror, PrettyPrint has support for Foundation types to have a better control over the output:
- All numeric types
- Arrays, sets and dictionaries
RawRepresentabletypes such as integer or string based enums- Dates
- URLs
- UUIDs
For example, this is how Set is supported:
extension Set: PrettyPrintable {
    public var isFoundationType: Bool { true }
    public var requiresNewline: Bool { true }

    public func pretty() -> String {
        map {
            prettyContent($0, indent: 0)
        }
        .joined(separator: "\n")
    }
}
This implementation maps over each element of the set, and uses the root prettyContent function to pretty-print each element.
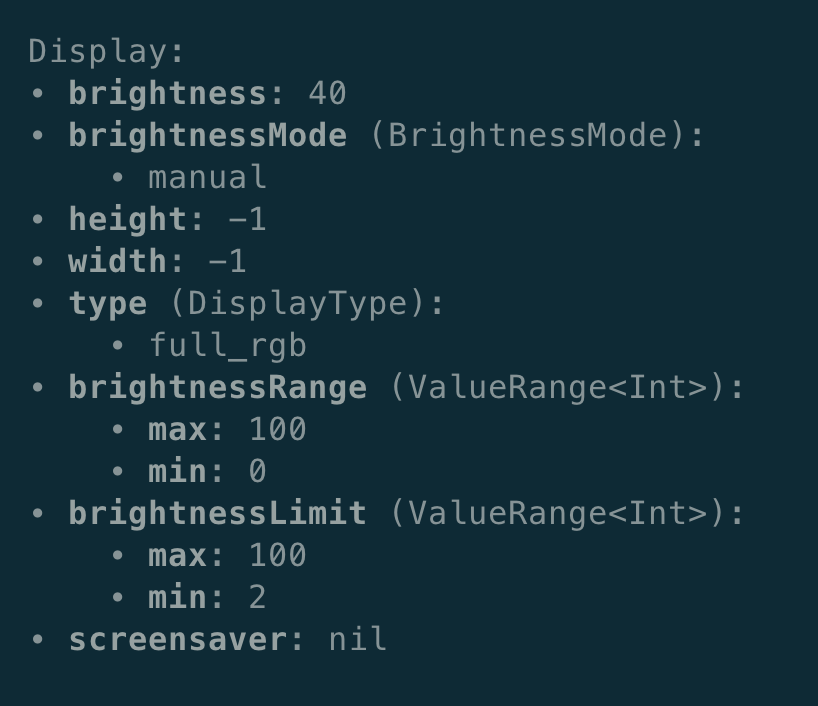
Still using the same object from the previous screenshots, here’s what the output looks like:


Installation and Usage
To use PrettyPrint in your project, start by adding the package dependency to your Package.swift file:
dependencies: [
    .package(url: "https://github.com/swifttoolkit/swift-pretty-print.git", from: "0.1.0")
]
Then, add the dependency to your target:
.target(
    name: "YourTarget",
    dependencies: [
        .product(name: "PrettyPrint", package: "swift-pretty-print")
    ]
)
Once you have added the dependency, import the PrettyPrint module in your files, and you are ready to go:
import PrettyPrint

@main
struct YourCLI {
    static func main() async throws {
        let myValue = try await performSomeHTTPRequest()
        prettyPrint(myValue)
    }
}
Customizing Your Own Types
Although PrettyPrint supports any Swift types, by implementing the Mirror based approach, you might want to have a more customized output for your own types.
Start by conforming your type to the PrettyPrintable protocol, and implement the only required method: pretty(). It should return a string that describes your type and its contents.
If your type is a collection, or has multiple properties, you should return true for the requiresNewline property. In this case, PrettyPrint will add a newline after the property name, instead of inlining the contents, as explained above.
Alternatives
Swift contains also a dump function, which also prints a value in a tree-like format. It is part of the standard library, and you can check the implementation here. If you prefer avoiding adding dependencies, that should definitely be your choice.
If you need a more feature-complete solution, with support for more types and Apple frameworks, check out PointFree’s CustomDump. It has support for types belonging to SwiftUI, UIKit, and other Apple platforms frameworks.
CustomDump provides also diffing capabilities and testing utilities.
Explore Further
Thank you for following along! We hope you enjoyed this post, learning how to leverage protocols and recursion to mimic and improve an existing function - in this case, Swift’s dump function - and turn it into a useful package!
Feel free to check the source code of PrettyPrint on GitHub, and give it a try in your own projects. Contributions are welcome!
Don’t hesitate to ask if you have any questions, suggestions or feedback via Mastodon or X. Happy coding!
See you at the next post. Have a good one!
