Hosting a Swift Server App on macOS
In the Dev Conversations episode with Adam Fowler and Joannis Orlandos, where we discussed Hummingbird and Docker, a reader submitted the following comment:
How would I make the Mac the Cloud Host provider in this situation? I’m not familiar with Docker or any of those related tools so those steps for that would be great as well.
In the current state of server development, deploying apps with Docker is usually the way to go. Although Docker definitely makes it easier to deploy and even run locally, what if your app uses macOS frameworks that are not available on Linux? Or maybe you don’t want to use Docker at all?
One option is to use macOS Login Items: it’s the simplest way to run any app once the system starts. It doesn’t require any coding and uses macOS’s user interface in the System Settings. But there is another option, much more powerful and flexible, that might be better for this use case: using launchd compatible daemons or agents.
Defining Important Concepts
Before jumping into code and running commands, it’s important to define what launchd, launchctl, agents and daemons are, and the difference between them.
launchd & launchctl
launchd is a component of macOS that starts, stops and manages applications, processes, and even scripts. While the parameters that launchd accepts are written in configuration files (in the plist format, as you’ll see later on), it doesn’t know how to read them.
This is the responsibility of another tool: launchctl. It parses the plist files, allowing to load or unload them, and tells launchd what to do. In the Terminal, you don’t interact with launchd directly, but with launchctl instead.
Daemons & Agents
launchd manages both daemons and agents, and sometimes they are called interchangeably. There are a few technical differences between them:
- Agents are scoped to the current user, whereas daemons are global and have no knowledge of the users in the system.
- Since daemons don’t know about users, they can’t access the window server or create a visual interface or launch a GUI application. They’re just background processes that respond to low-level requests.
- Agents are usually used for services that need to run with the user’s login session, while daemons are used for services that need to run independently of any user session - even when no user is logged in.
In this post we will create an agent, but the same concepts apply to daemons.
The Sample Server App
The focus of this post is not the server app itself, but rather how to host it on macOS, so this post uses a simple Vapor app as an example. To follow along, you can create an app with the Vapor CLI by running the following command:
vapor new SampleServer --no-fluent --no-leafAfter opening the project you just created in your favorite editor, look for the Sources/App/routes.swift file. You’ll see it contains two routes, which you’ll use to call to test if the server is running. Additionally, insert a method that explicitly makes the process to crash - so you can test the restart mechanism later on:
app.get("crash") { _ in
    let array = [1, 2, 3]
    let boom = array[42]
    return "This will never be returned"
}
Note: modern Swift applications use do/catch statements to handle errors, and throw errors to communicate failures. For the sake of this post, we intentionally want to crash the app to demonstrate how to restart it.
Building and Moving the App
To build the server app, run the following command in the terminal:
swift build -c releaseTo find the path to the built executable, run the following command:
swift build -c release --show-bin-pathThis will output the absolute path to the executable. If you’re on an Apple Silicon Mac, the relative path of the containing directory will be .build/arm64-apple-macosx/release (or .build/x86_64-apple-macosx/release if you’re on an Intel Mac). Open this directory using the open command:
open .build/arm64-apple-macosxYou can find in this directory all the build artifacts, including the executable, in this case called App. For the sake of this post, you can move it to the desktop with the command below, or manually using Finder. Remember to rename it to SampleVapor - the name you’ll use to launch it later on:
mv .build/arm64-apple-macosx/release/App ~/Desktop/SampleVaporCreating an Agent
As explained earlier, a launchd agent is scoped to the current user, and this is what you’ll use for this tutorial.
Create a new file under the directory ~/Library/LaunchAgents. Following the convention, you should use the reverse domain name notation for the file name. We’ll name it dev.swifttoolkit.sample-vapor.plist.
touch ~/Library/LaunchAgents/dev.swifttoolkit.sample-vapor.plistOpen the file in your editor and insert the following content:
<!-- 1 -->
<?xml version="1.0" encoding="UTF-8"?>
<!DOCTYPE plist PUBLIC "-//Apple//DTD PLIST 1.0//EN" "http://www.apple.com/DTDs/PropertyList-1.0.dtd">
<plist version="1.0">
<dict>
    <!-- 2 -->
    <key>Label</key>
    <string>dev.swifttoolkit.sample-vapor</string>

    <!-- 3 -->
    <key>ProgramArguments</key>
    <array>
        <string>~/Desktop/SampleVapor</string>
    </array>
</dict>
</plist>
This is the minimum required to create an agent. Here’s a quick explanation of each part:
- Declare this as a plist file based on the XML format, and use the
dictkey to open a dictionary which contains all the configuration. - Identify the service using the
Labelkey. It must be unique, and as a good practice, use again the reverse domain name notation. This is the name you’ll use to start and stop the agent later on. ProgramArgumentsis an array of strings. The first string is the path to the executable, and you can use the subsequent elements to pass arguments to the executable - a common thing in command-line tools.
Loading and Starting an Agent
Upon a new login session by the user, launchd will load all the agents in the ~/Library/LaunchAgents directory. Since you’re already logged in, you need to manually load the agent via launchctl. Remember, you should not call launchd directly:
launchctl load ~/Library/LaunchAgents/dev.swifttoolkit.sample-vapor.plistNote: In modern macOS versions, you will see a notification from the system, warning you that a background item was added, with the name of the executable. It will also let you know where to find the list of all background items, in System Settings, under Login Items & Extensions.
Loading an agent and running it are different concepts. The former is the process of telling launchd to load the agent into its process list without necessarily executing it. The latter is actually executing the agent. You can use the list subcommand of launchctl to check if the agent is running:
launchctl list | grep -E '^PID|dev.swifttoolkit.sample-vapor'In this case, it has never been started, so you’ll see an empty list of processes.
To manually start the agent, you can use the start subcommand of launchctl, passing the label as the single argument:
launchctl start dev.swifttoolkit.sample-vaporNow if you run the previous list command again, you’ll see the agent in the list of running services, along with two other bits of information: the process ID and the exit code of the process - or 0 if it’s still running:
PID	    Status	Label
75046	0    	dev.swifttoolkit.sample-vapor2
To test that it’s indeed running, execute a curl request to the /hello endpoint:
curl http://localhost:8080/helloStarting and Restarting Automatically
Having the ability to manually start and stop an agent’s service is great, but even better is having launchd start it automatically. The same is valid for restarts: you can ask it to restart the process if it crashes.
To do so, add both RunAtLoad and KeepAlive keys to the agent’s plist in the root dictionary, setting both to true:
<key>RunAtLoad</key>
<true/>

<key>KeepAlive</key>
<true/>
You can now stop the service manually and unload the agent using the unload subcommand of launchctl, passing the label as the single argument:
launchctl unload ~/Library/LaunchAgents/dev.swifttoolkit.sample-vapor.plistIf you load it again with the previous load command, launchd will start the service automatically.
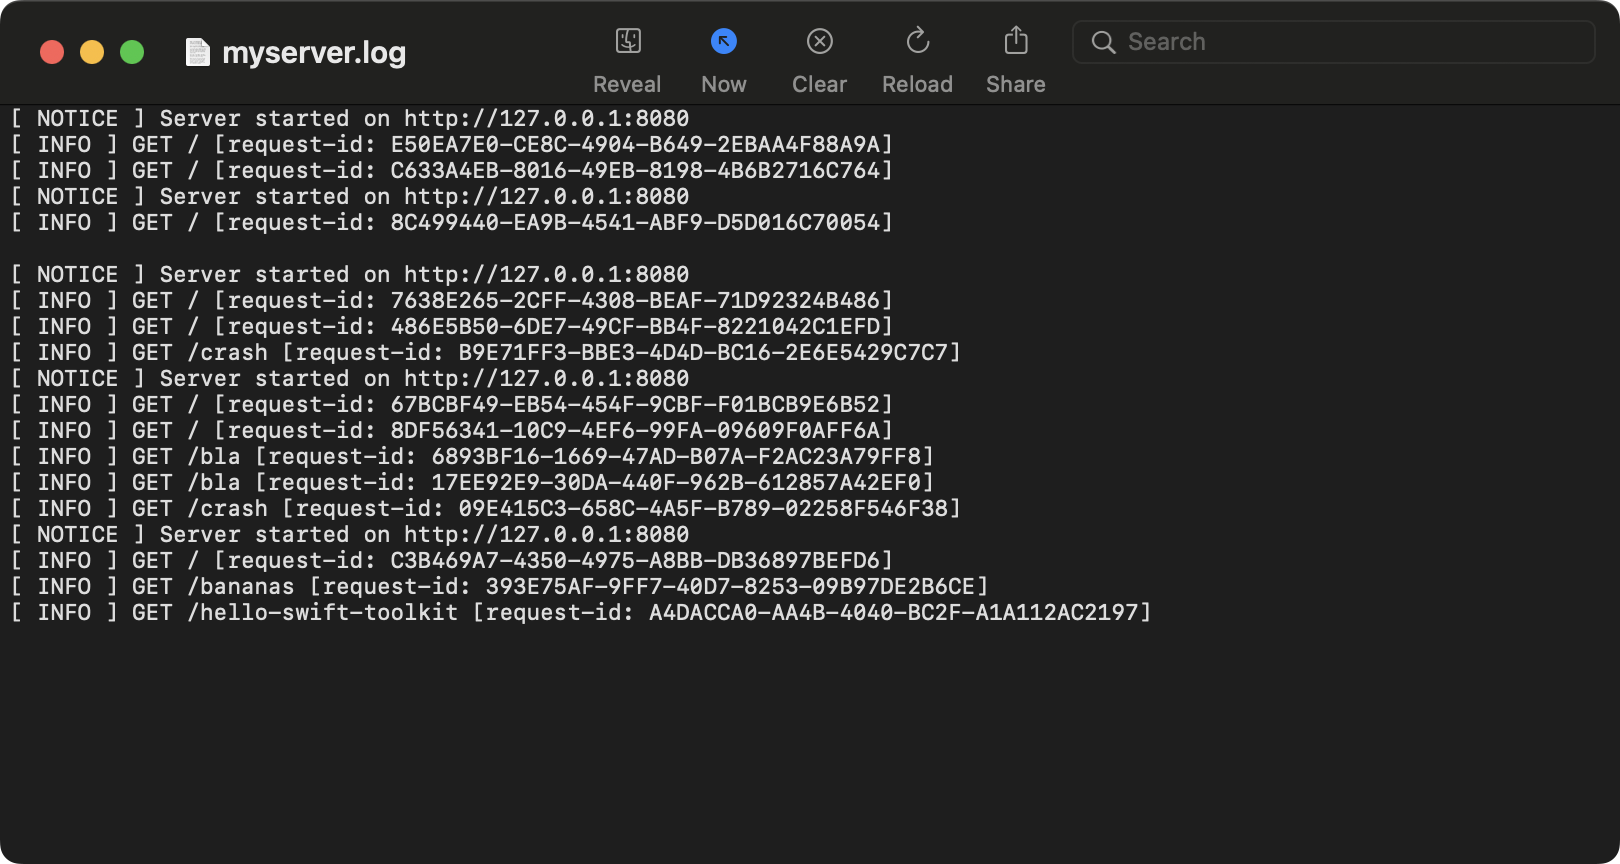
Now, even if you call the crash route, the service will restart automatically:
Debugging
You can also configure a way to keep a log of both the standard output and standard error of the process. Be aware, however, that these files might grow in size and you could eventually end up with a huge log file, possibly leaving no space left on the disk depending on where you save them!
Define the StandardOutPath and StandardErrorPath keys in the agent’s plist file, pointing to a valid path in your system:
 <key>StandardOutPath</key>
 <string>/tmp/sample-vapor.log</string>

 <key>StandardErrorPath</key>
 <string>/tmp/sample-vapor.error.log</string>
To inspect the log files, you can either print their content in the Terminal (with cat or less or tail), or open them in an editor. The best choice, however, for opening these files is the Console app, and its Now mode:

Using the LaunchControl App
Managing launch agents, their keys and values, and starting and stopping processes… it can be challenging to keep track of it all. Fortunately, talented developers created a tool to help with this: LaunchControl.
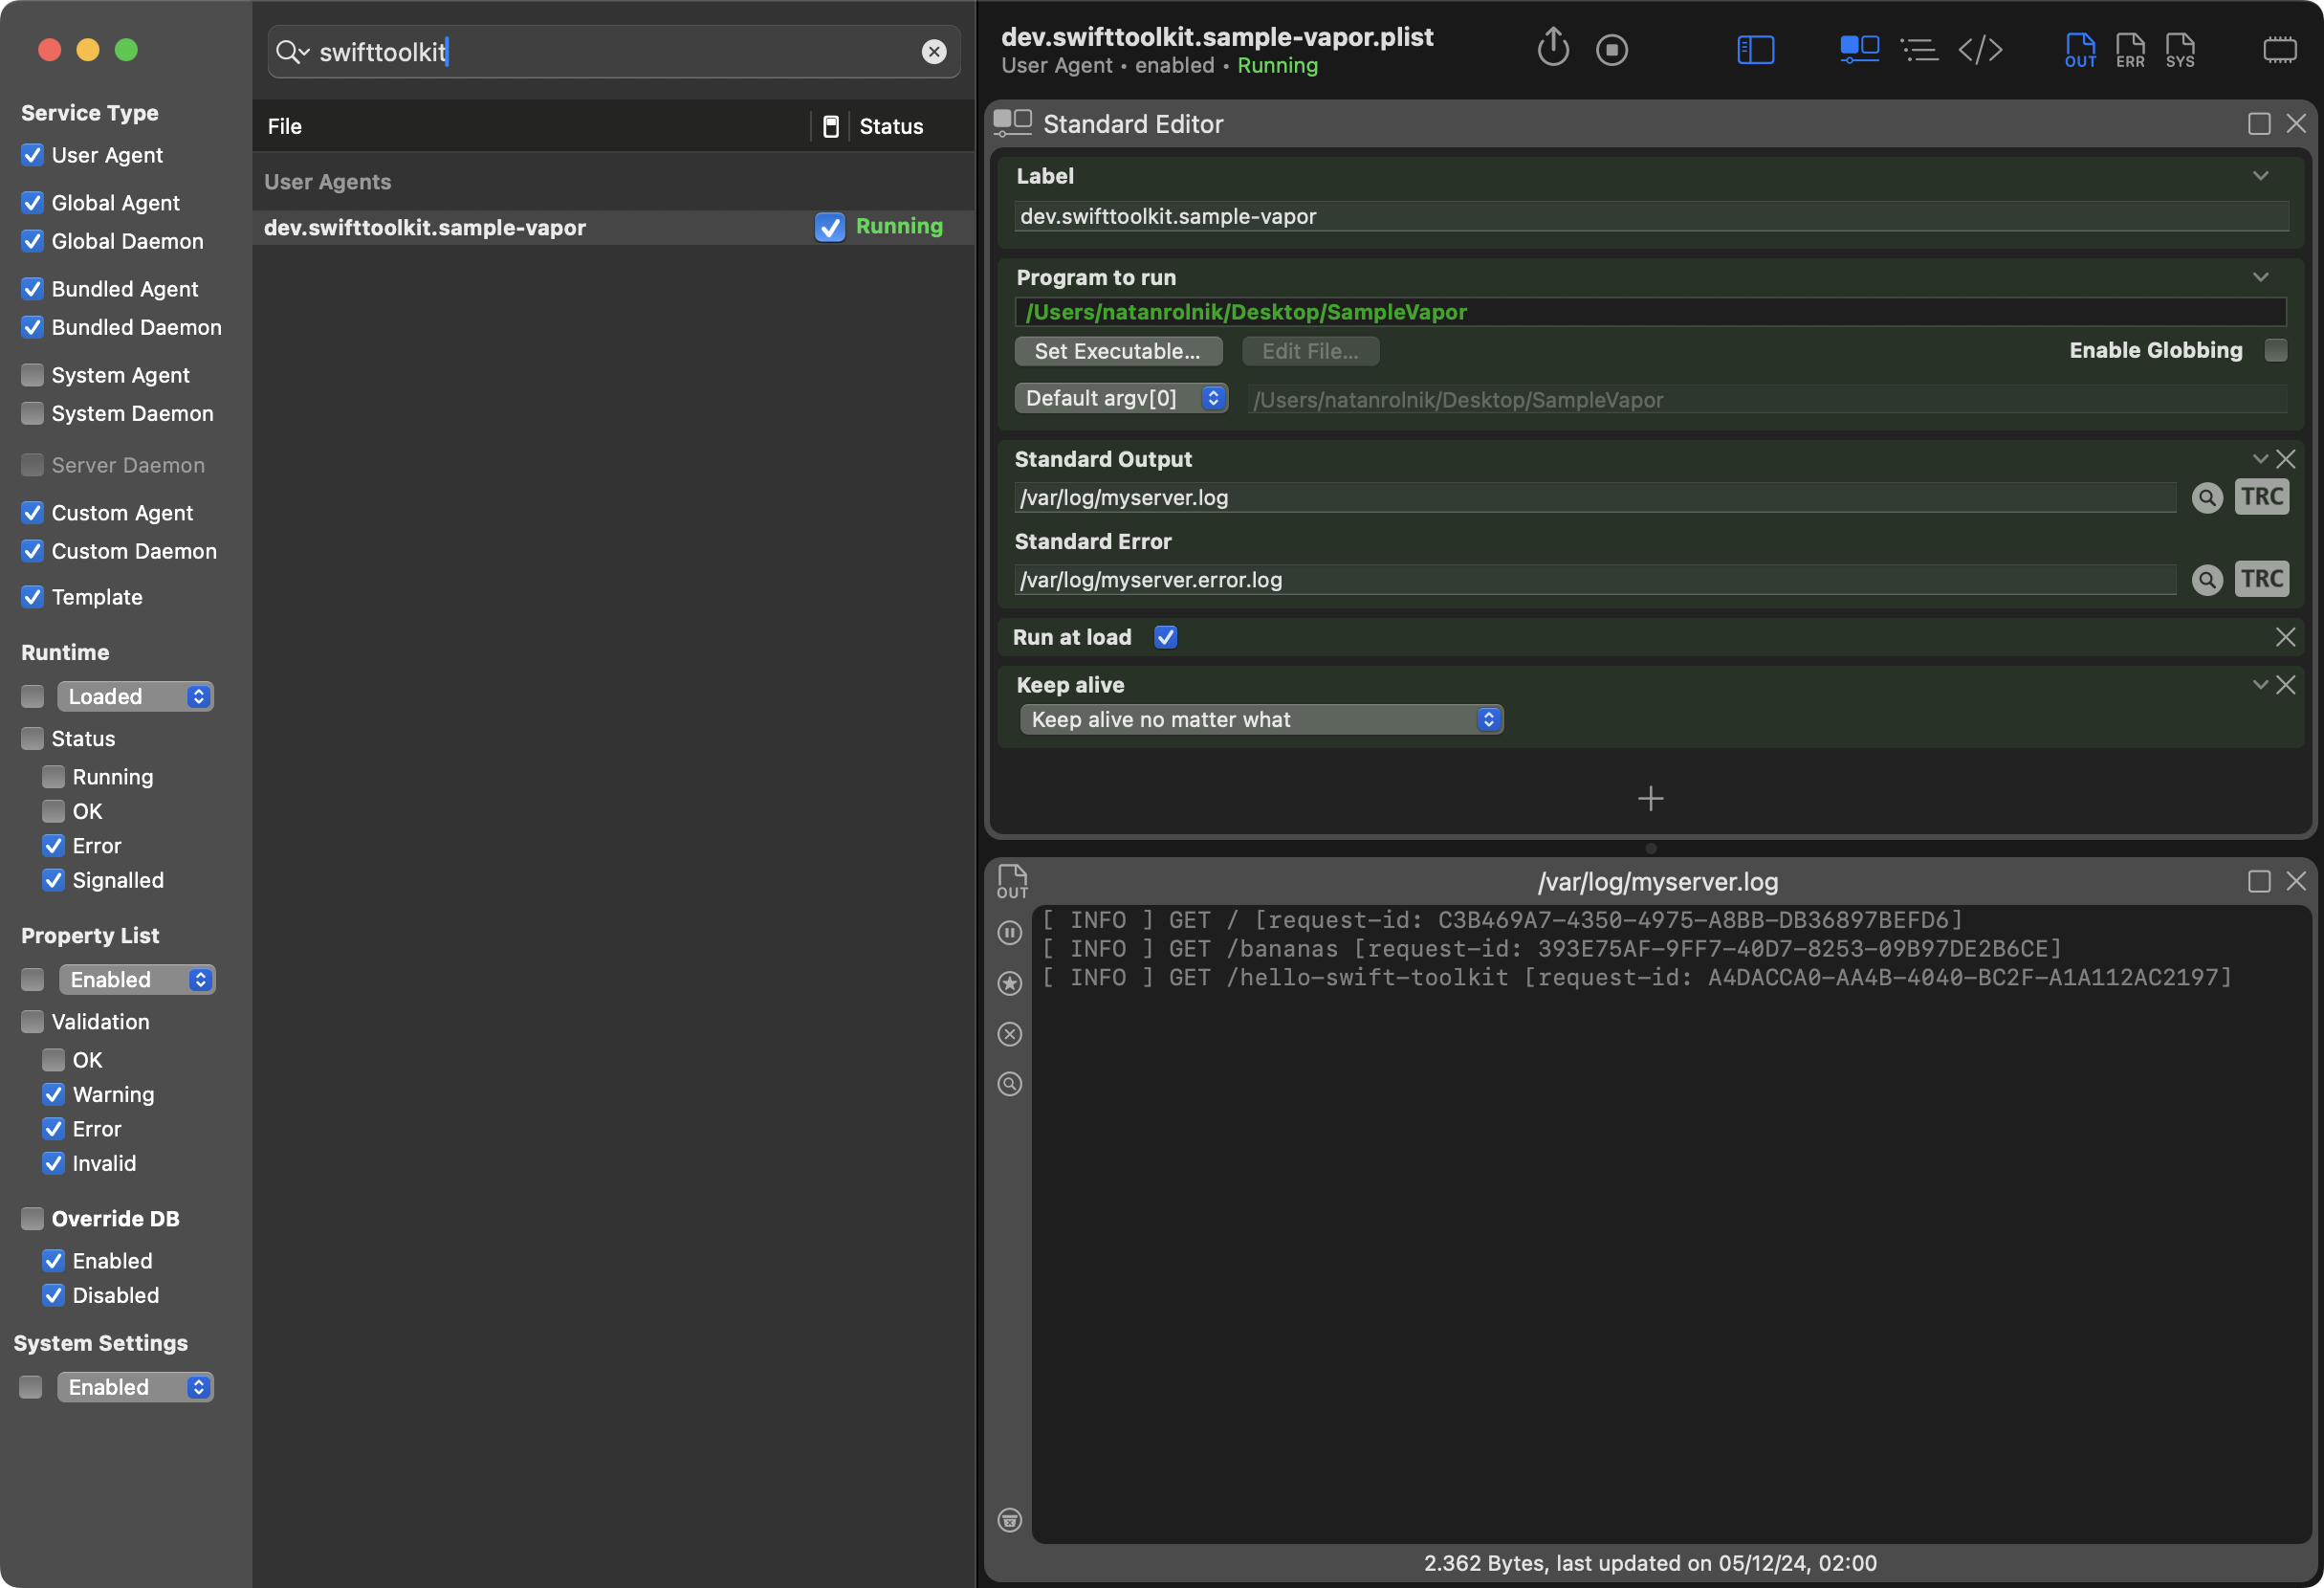
It allows you to see all the different launch agents you have, filtering them by different parameters, such as global vs. user-specific. Besides that, it allows you to edit the configuration files with a nice UI, and to search for all the 36 different keys you can use in the plist files (including a search, and an explanation of each key).
This is how the file you created earlier looks like in LaunchControl, with the Standard Output view as a split view:

Exposing the Server
If you want to access your server on a local network, you’re good to go. However, to access it from outside the local network, you’ll need to use a tool like ngrokor Pinggy. These utilities create temporary public URLs, to expose your local app to the internet, making it accessible from anywhere.
For example, considering the app is listening on the 8080 port as shown in this article, you can run this command:
ngrok http http://localhost:8080This will open a connection between your machine and the ngrok servers, and will result in a public URL ready to receive and forward HTTP requests.
Explore Further
Knowing how to use launchctl, daemons and agents is a powerful skill to have! Let us know if you have any questions or comments about this topic, via X or Mastodon.
Here are some final notes:
This article scratched only the surface of what you can do with
launchd. You can use theThrottleIntervalkey to control how often the agent can be restarted, orEnvironmentVariablesto pass environment variables to the application.As mentioned in the last section above, it’s a good idea to give LaunchControl a try if you want to make your life easier!
The developers of LaunchControl also put together a great guide: launchd.info, with different sections to help you understand how to use
launchdandlaunchctlto manage your services.For more information, check out the Daemons and Services Programming Guide, especially the Creating Launch Agents and Daemons chapter.

