Generating Analytics Code with Mustache
In a previous post, we explained how to use Mustache templates in Swift for code generation and any templating task. Although that post contains interactive examples, they’re small bits of code, to allow you to understand specific concepts of Mustache.
This post, in contrast, will show a real-world example where Mustache can be used in a CLI tool, in the following scenario: given a list of analytic events, it will generate statically-typed code in Swift. The generated code can be used from an iOS app, when sending those events to your server or a third-party analytics service.
At the end of the post, you’ll find a challenge, where you’ll be able to test your understanding of both Mustache and adding more capabilities to the CLI tool.
The Sample Project
You can follow along this post by downloading the starter project, which you can find on GitHub:
Make sure you checkout the starter branch.
Once you open the project, you can notice a few important pieces:
- First, the Events.md file: it contains a markdown table with a list of analytics events.
- Then, in the Sources/AnalyticEvent.swift file, look at the
AnalyticEventstruct. It represents the event and its properties, and will be used to decode the events from the markdown table into structured data.
What the tool will do, is to load the markdown table, parse it into an array of AnalyticEvents and use the Mustache template to generate the contents of a Swift file, saving it to the disk. To do this, the executable target depends on 3 packages (already present in the Package.swift file): MarkCodable, Swift-Mustache and the Swift Argument Parser.
Including Templates as Resources
Still exploring the project, you can find a folder located at Sources/Resources, with two mustache files. As the goal of this post is not to explain Mustache, but to show how to use it in a CLI tool, the templates are ready, so you can focus on the code generation part. If you want, take a look at them, trying to understand what each part does and what the result will be.
Because the tool needs to find the templates, the best choice is to include them as resources in the executable target definition. Open the Package.swift file, and add the following code after the dependencies property:
dependencies: [
    //... existing dependencies
],
resources: [
    .copy("Resources")
]
SPM will copy the resources to the build directory, making them available during runtime via the Bundle.module static property. Without adding this line, the tool will fail to find the templates, so it’s extremely important to include it.
Loading the Events
You haven’t seen yet the entrypoint of the tool. To find it, open the Sources/AnalyticsGenerator.swift file.
Because this struct uses the Swift Argument Parser, there’s no need to write a main() function. Instead, it uses the @main attribute and the run() function.
Besides the run() function, you’ll find two other methods: loadEvents() and generate(using:). As the previous section already explained, the first method will load the events from the Events.md file, and the second one will generate the code using the Mustache template.
When building your own tool, you can choose load the events from a JSON file, or maybe from a remote source, such as Airtable, Notion or Monday.com. For the sake of simplicity, the sample project uses the Markdown table, which is easy to read, edit, and parse.
In the loadEvents() method, replace the empty array with the following code:
//1
let inputPath = FileManager.default.currentDirectoryPath + "/" + input

//2
let eventsTable = try URL(fileURLWithPath: inputPath).loadString()

//3
return try MarkDecoder().decode([AnalyticEvent].self, from: eventsTable)
Here’s what each line does:
- Build the input path, based on the current directory where the tool is executed from, and the input argument (check the
@Option-wrappedinputproperty in the top of the struct). - Use the
loadString()method (present in the URL+Helpers extension) to load the input file into a string. - Finally, instantiate a
MarkDecoderand decode the string into an array ofAnalyticEvents, and return this array.
With that, the run() function now has the events, and it needs to pass them to the generate(using:) method.
Generating the Code with Mustache
It’s time to implement the generate(using:) method. As you can see, it expects a single parameter: the AnalyticEvent loaded in the previous section.
Replace the empty string returned there with the following code:
//1
guard let templateURL = Bundle.module
    .url(forResource: "EventsSwift", withExtension: ".mustache") else {
    fatalError("Template file not found")
}

//2
let templateString = try templateURL.loadString()
let template = try MustacheTemplate(string: templateString)

//3
return template.render(["events": events])
This code is actually simpler than it looks. Here’s what it does:
- Use
Bundle.moduleand theurl(forResource:withExtension:)method to get the path of the EventsSwift.mustache file. - Load the template into a string, and initialize a
MustacheTemplatewith it. - Finally, use the
render()method on the template, passing theeventsarray inside a dictionary. Return the string as the method’s return value.
So far, so good. Now you have the generated code in the memory, and you need to save it to the disk to finalize the loop.
Saving the Generated Code
As you can see, the run() method calls these two methods you just implemented, but does nothing with the result.
While the input file is passed as an argument to the tool, this tutorial will use a hardcoded output path. If you want instead to make your tool more flexible, you can add another @Option, similar to the input property, and use it.
At the end of the run() method, add the following code:
let outputPath = FileManager.default.currentDirectoryPath + "/Events.swift"
try generatedCode.write(
    to: URL(fileURLWithPath: outputPath),
    atomically: true,
    encoding: .utf8
)
This piece of code will build a path to an Events.swift at the running directory, and write the generated code to it!
You can now run the tool from Terminal, using the following command:
swift run AnalyticsGenerator --input Events.mdYou can now open the Events.swift file, and see the generated code! Here’s how the flow will look like. Notice the file appearing in the Finder window on the right, after the tool finishes running:
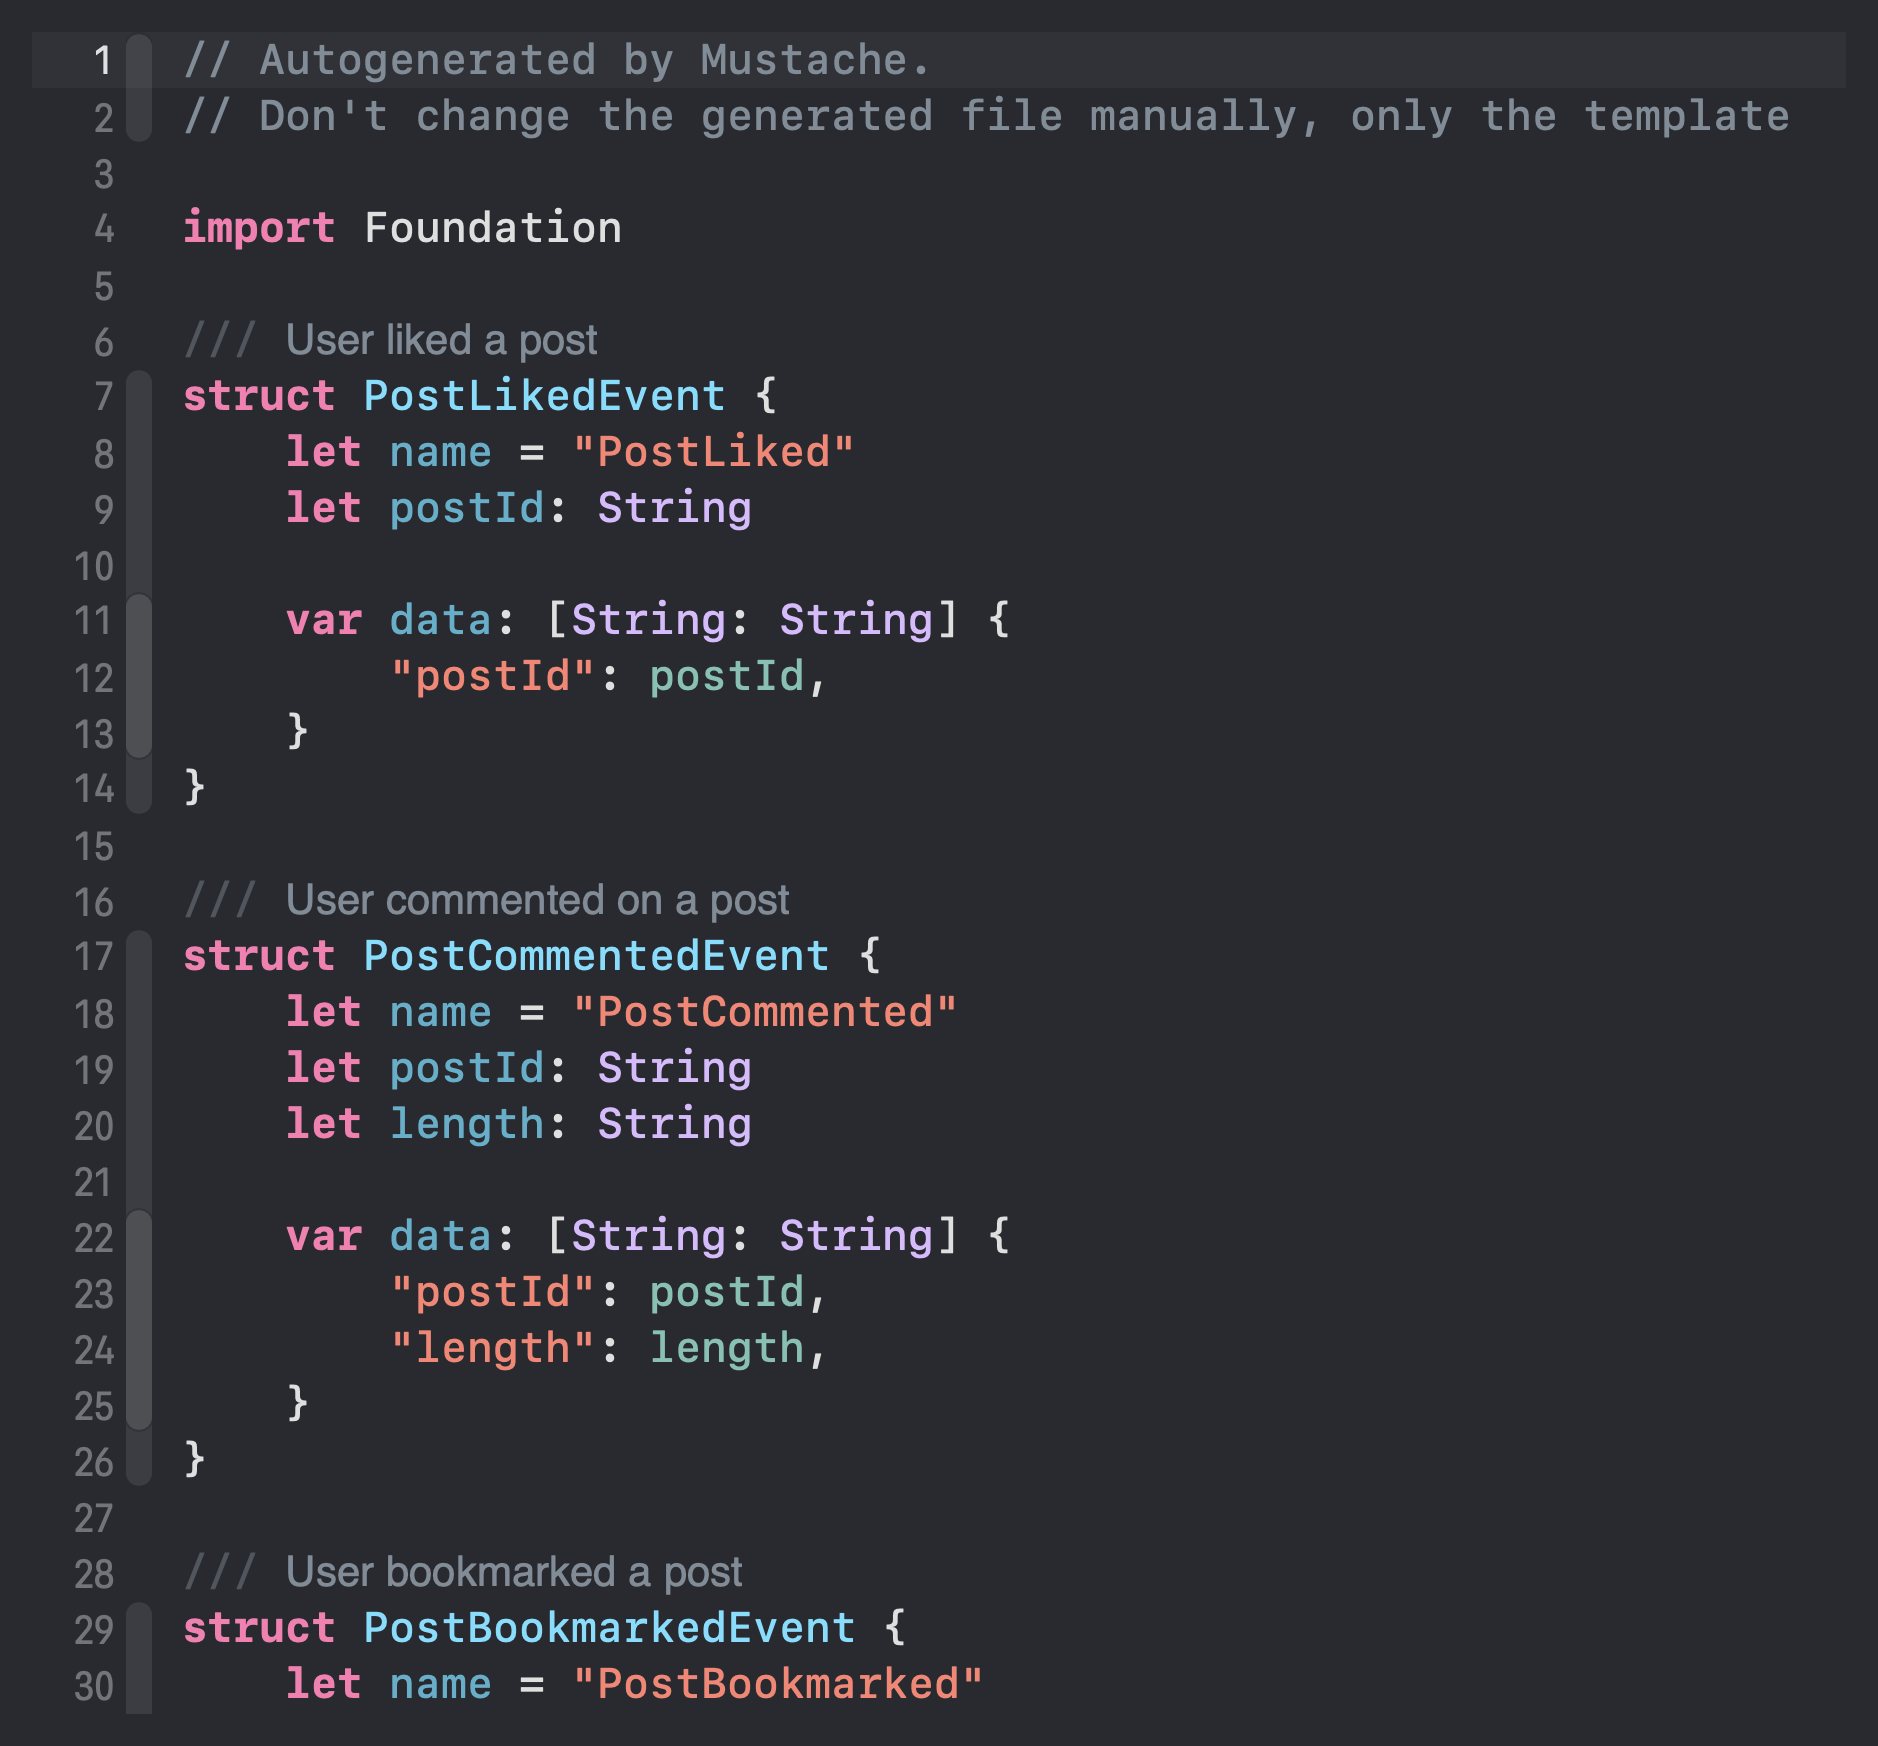
This is the Swift code generated from the markdown table:

Feel free to modify the Events.md file, by adding events to the table (keeping the same format). Run the tool again, and see how the generated code changes!
Challenge
One advantage of the tool already loading and parsing the events, is that you can use them with different templates. For example, if you built this tool for an iOS app, and you’re part of a team that also works in the Android app, with a few changes you can generate the same events in Kotlin.
The sample project already contains the EventsKotlin.mustache file, so the challenge is to modify the tool to support both templates, depending on what the user passes as an argument.
The goal is to add a new argument to the tool, which it should use determine the output language. The tool should then use the correct template and save the generated code to the disk. The command should look like this:
swift run AnalyticsGenerator --input Events.md --format kotlin # or swiftSee Tips
- Use an enum to represent the different formats (make it of type
String, conform toExpressibleByArgument) - Use the
@Optionproperty wrapper to add a new argument to the tool, using the enum as the type. - Modify the template URL logic to use the new argument.
- Modify the output path logic to use the new argument.
Reveal Solution
You can find the solution for the challenge in this commit.
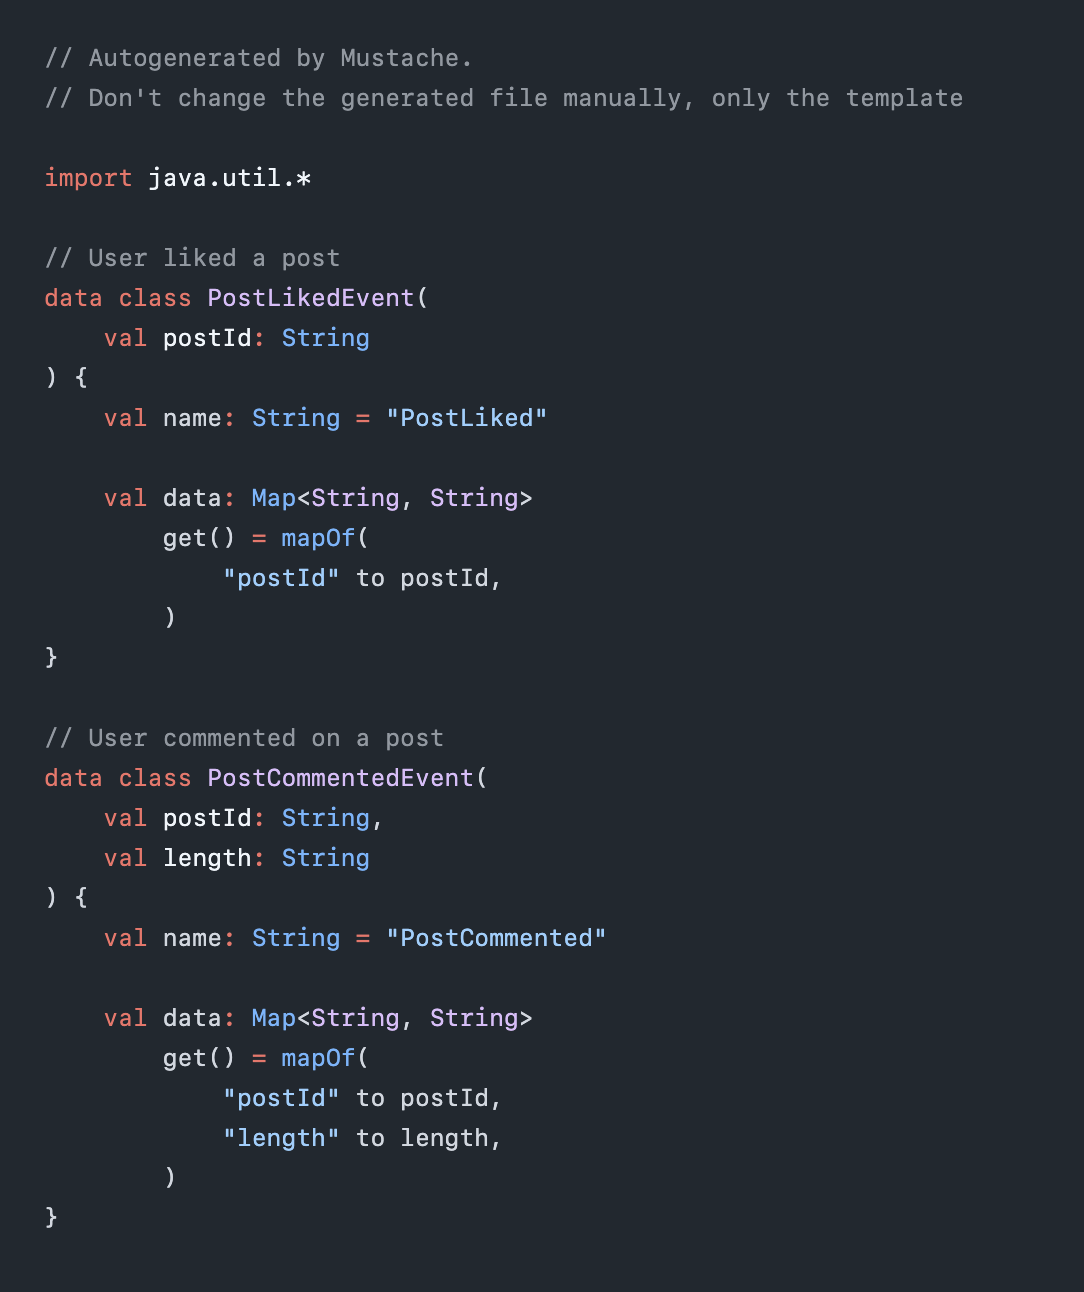
Once you get the solution, and run the tool with the command above, you’ll see the same events, but this time in Kotlin:

Explore Further
Code generation is a powerful capability that can save you and your team a lot of time!
But its real value comes when you automate it. Be it in a CI/CD pipeline (triggered via webhook or new commits), or as a build step in your project, you can ensure that the code is always reflecting the data source.
Additionally, you can think of new ways to use it in your projects, and with that, create your own tools! Here are some ideas:
- Generate UIKit/SwiftUI code from a Sketch or Figma design
- Use Mustache in a server-side application, to generate HTML emails
- Create mock objects and test data for unit testing
- Create boilerplate code for common architectural patterns in your codebase
I hope you enjoyed this tutorial! Feel free to ask any questions, send suggestions or feedback via Mastodon or X.
See you at the next post. Have a good one!

 Download the starter project to follow along