Swift on Raspberry Pi: Building Natively and Cross Compiling
The Raspberry Pi is a series of single-board computers that became very popular in the last few years. Due to its small size, low cost and low energy consumption, it can be used in a wide range of applications: home automation, media center, or even business applications. The running operating system is the Linux-based Raspberry Pi OS, and this makes it possible to run Swift on it - scripts or even applications, such as servers.
This post will first give some tips on how to setup a Raspberry Pi, and then cover the two ways of running a Swift app on it: building directly on the Raspberry Pi, and using Swift 6’s new cross-compilation feature (which allows the compilation of Swift code on a Mac) to build a Vapor application. No Docker required!
If you already have a Raspberry Pi setup, you can skip to the Building Natively on the Pi section.
Setting up the Raspberry Pi
If you already have a Raspberry Pi but you haven’t set it up yet, fear not! This section will help you get started, and avoid making mistakes that might not be obvious for someone not used to it.
Flashing the Micro SD Card
To start, download and install Raspberry Pi Imager on your Mac. This is the official and recommended application to flash your Micro SD card with the Raspberry Pi OS.
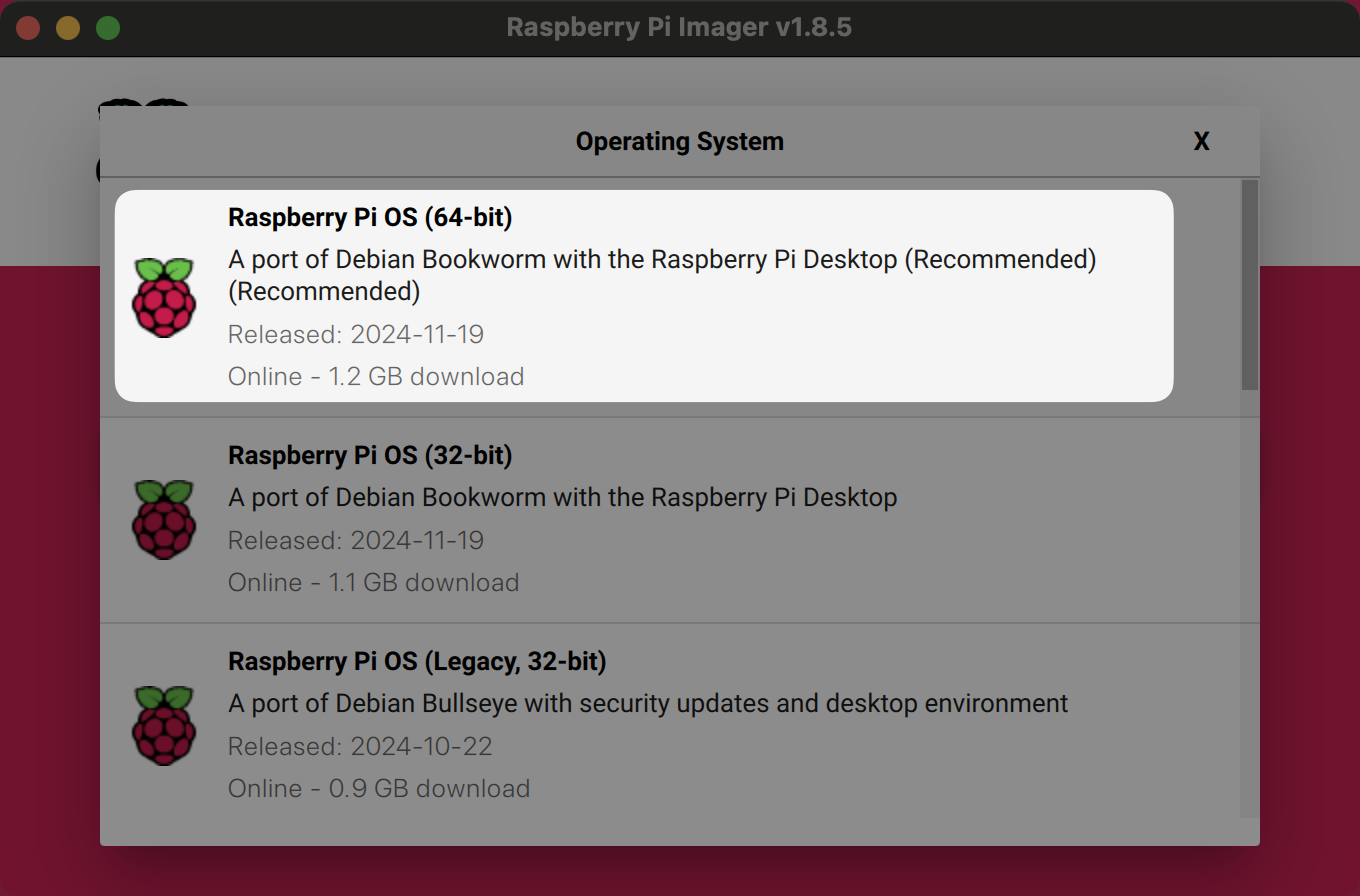
After choosing your device (Raspberry Pi 3, 4 or 5), select the OS. In this case, the 64-bit version of Raspberry Pi OS is what you need.

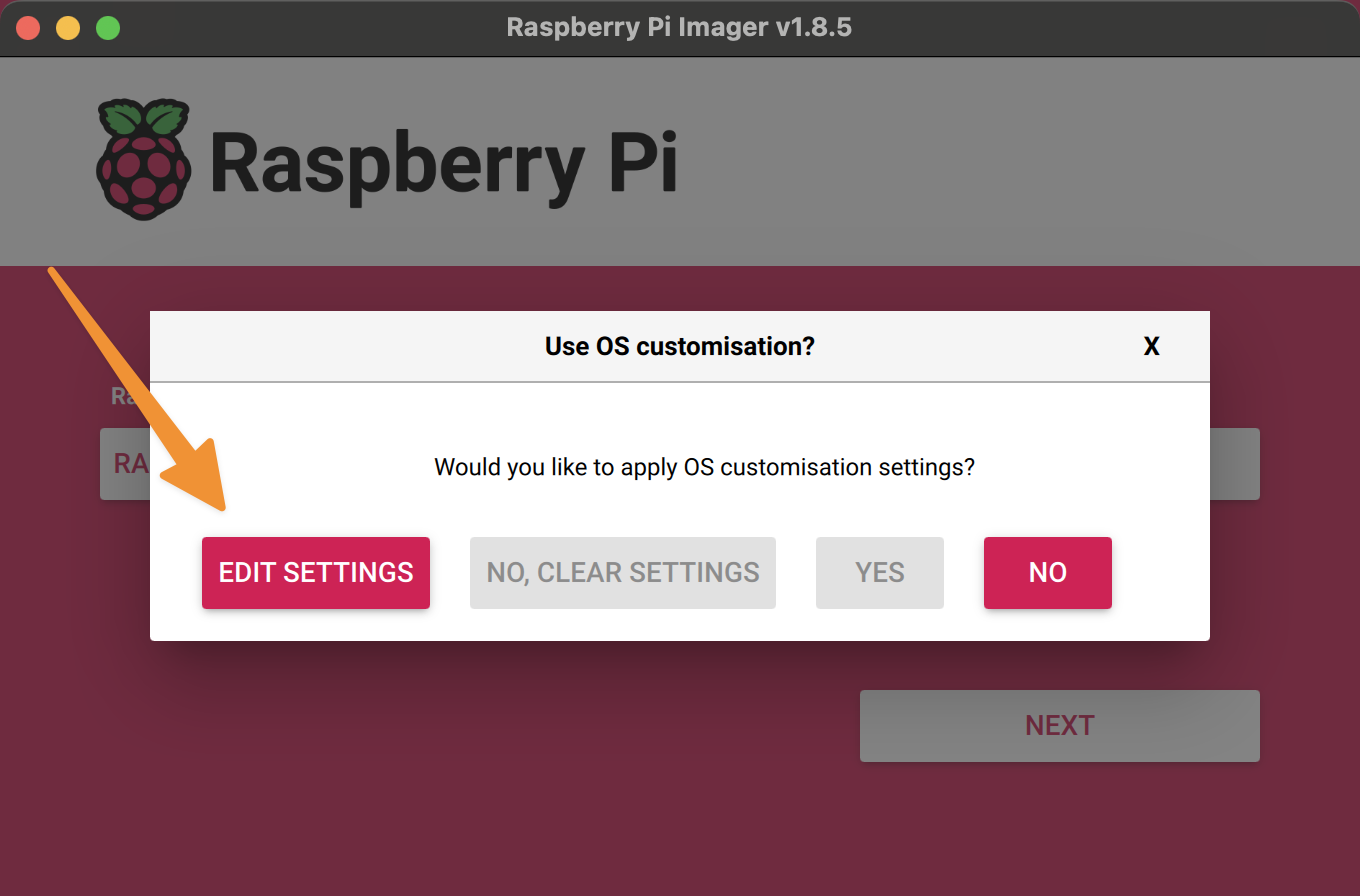
Make sure your Micro SD card is inserted and can be seen by your Mac, and select it in the Storage section. When clicking Next, you’ll be asked if you want to customize the OS - with options such as WiFi configuration, hostname, and more. These are optional, but important to make connecting to the Pi easier, so click Edit Settings:

Once in the settings, configure the following sections marked in the screenshot below:
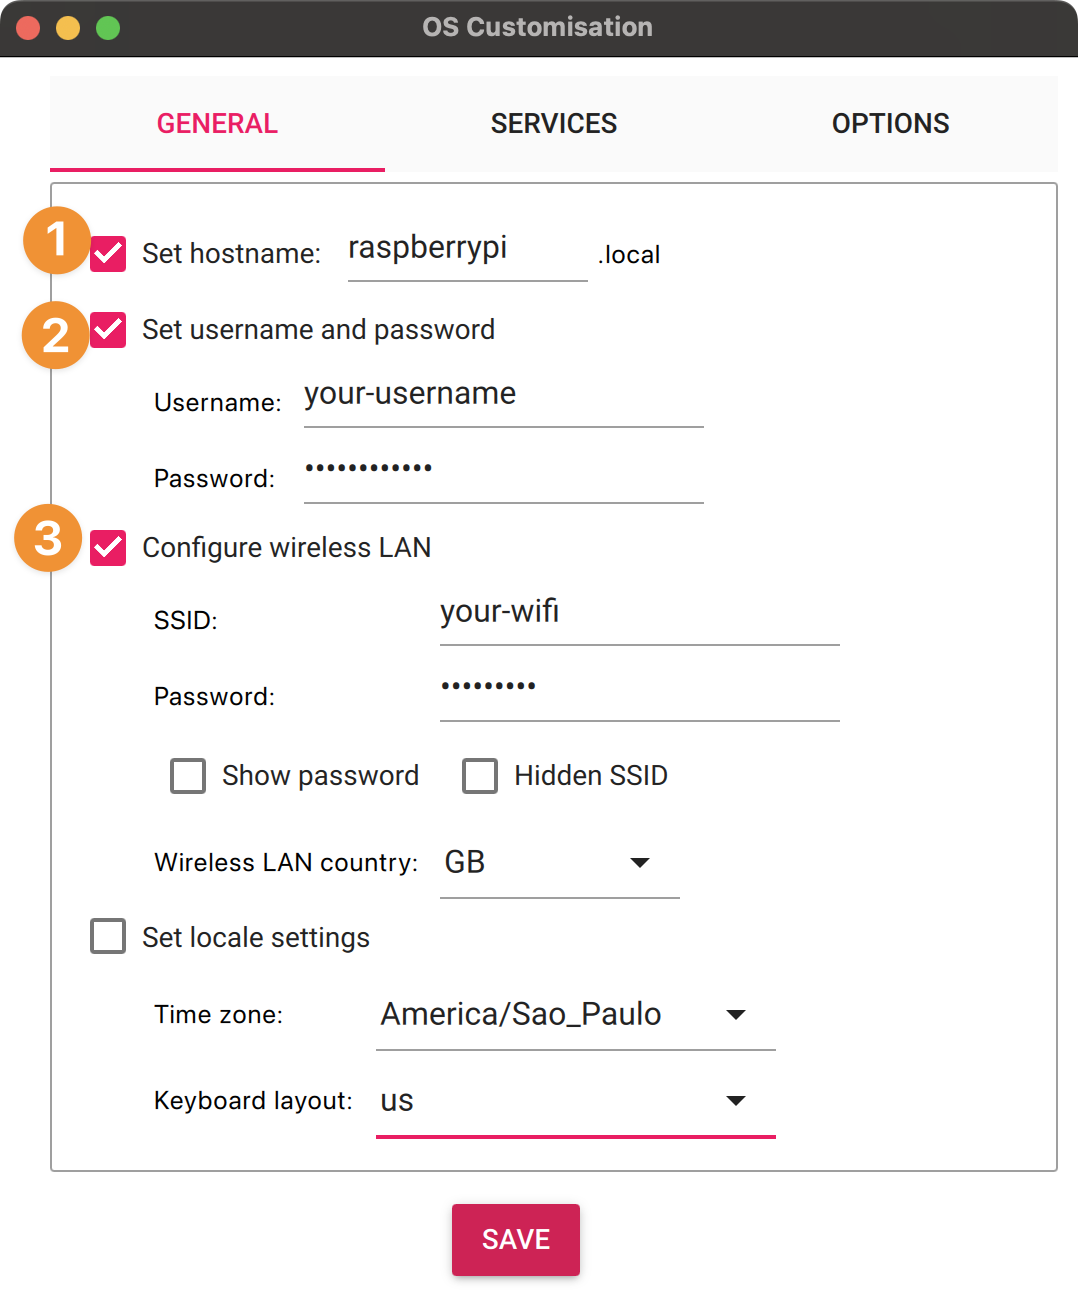

This is why they’re important:
- Using a custom hostname makes it easier to connect to the Pi via SSH, without the need to search for the IP address. Being in the same network, you can use the hostname
raspberrypi.local(or any name you choose) to connect to the Pi. - A username and a password for the user allow you to access the Pi via SSH, in a secure way.
- If you’re not using a wired connection, configuring the WiFi connection from the imager will make the device connect to it upon boot.
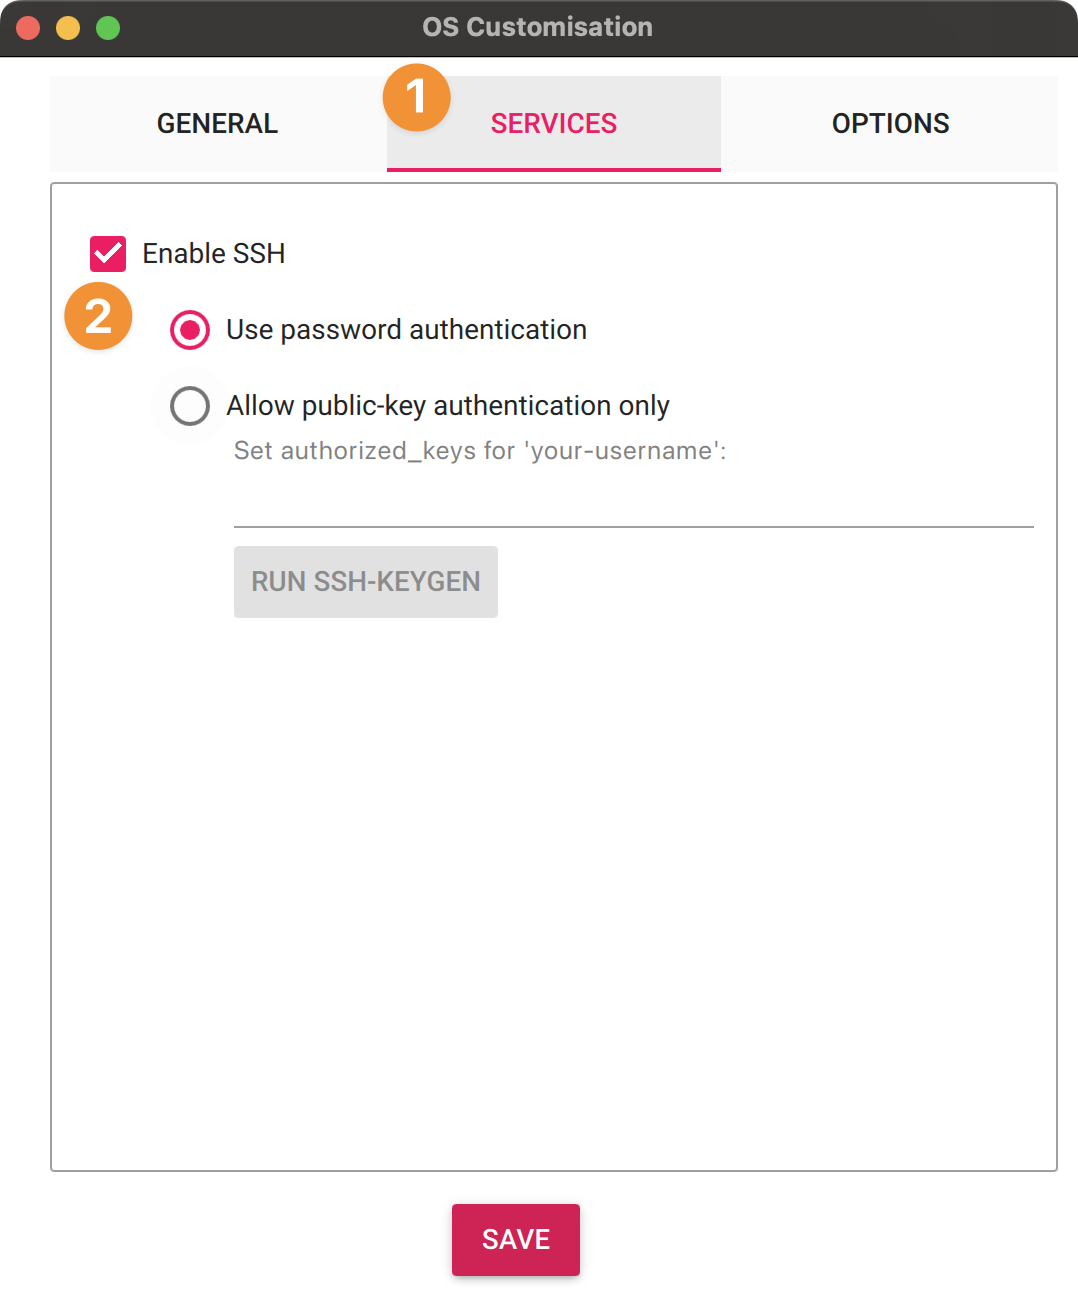
Next, click the Services tab and make sure the SSH checkbox is selected:

This is all you need to flash the Micro SD card. Go ahead and start the flashing process by clicking Write. This might take a few minutes. Once the process is complete, eject the Micro SD card from your Mac, insert it into the Raspberry Pi, and power it up.
Connecting to the Raspberry Pi
The initial connection will use SSH. Instead of having to search for the IP address, you can use the hostname raspberrypi.local you configured in the steps above. If you have the IP address, you can also use it:
ssh your-username@raspberrypi.localWhen prompted for a password, type the password you configured in the Raspberry Pi Imager in the username and password section.
You can continue using SSH to interact with the Raspberry Pi, but if you prefer a graphical interface, you can use VNC to access the display. While connected via SSH, run the following command to enable VNC:
sudo raspi-configThis will bring a menu in the command line. Choose Interface Options:
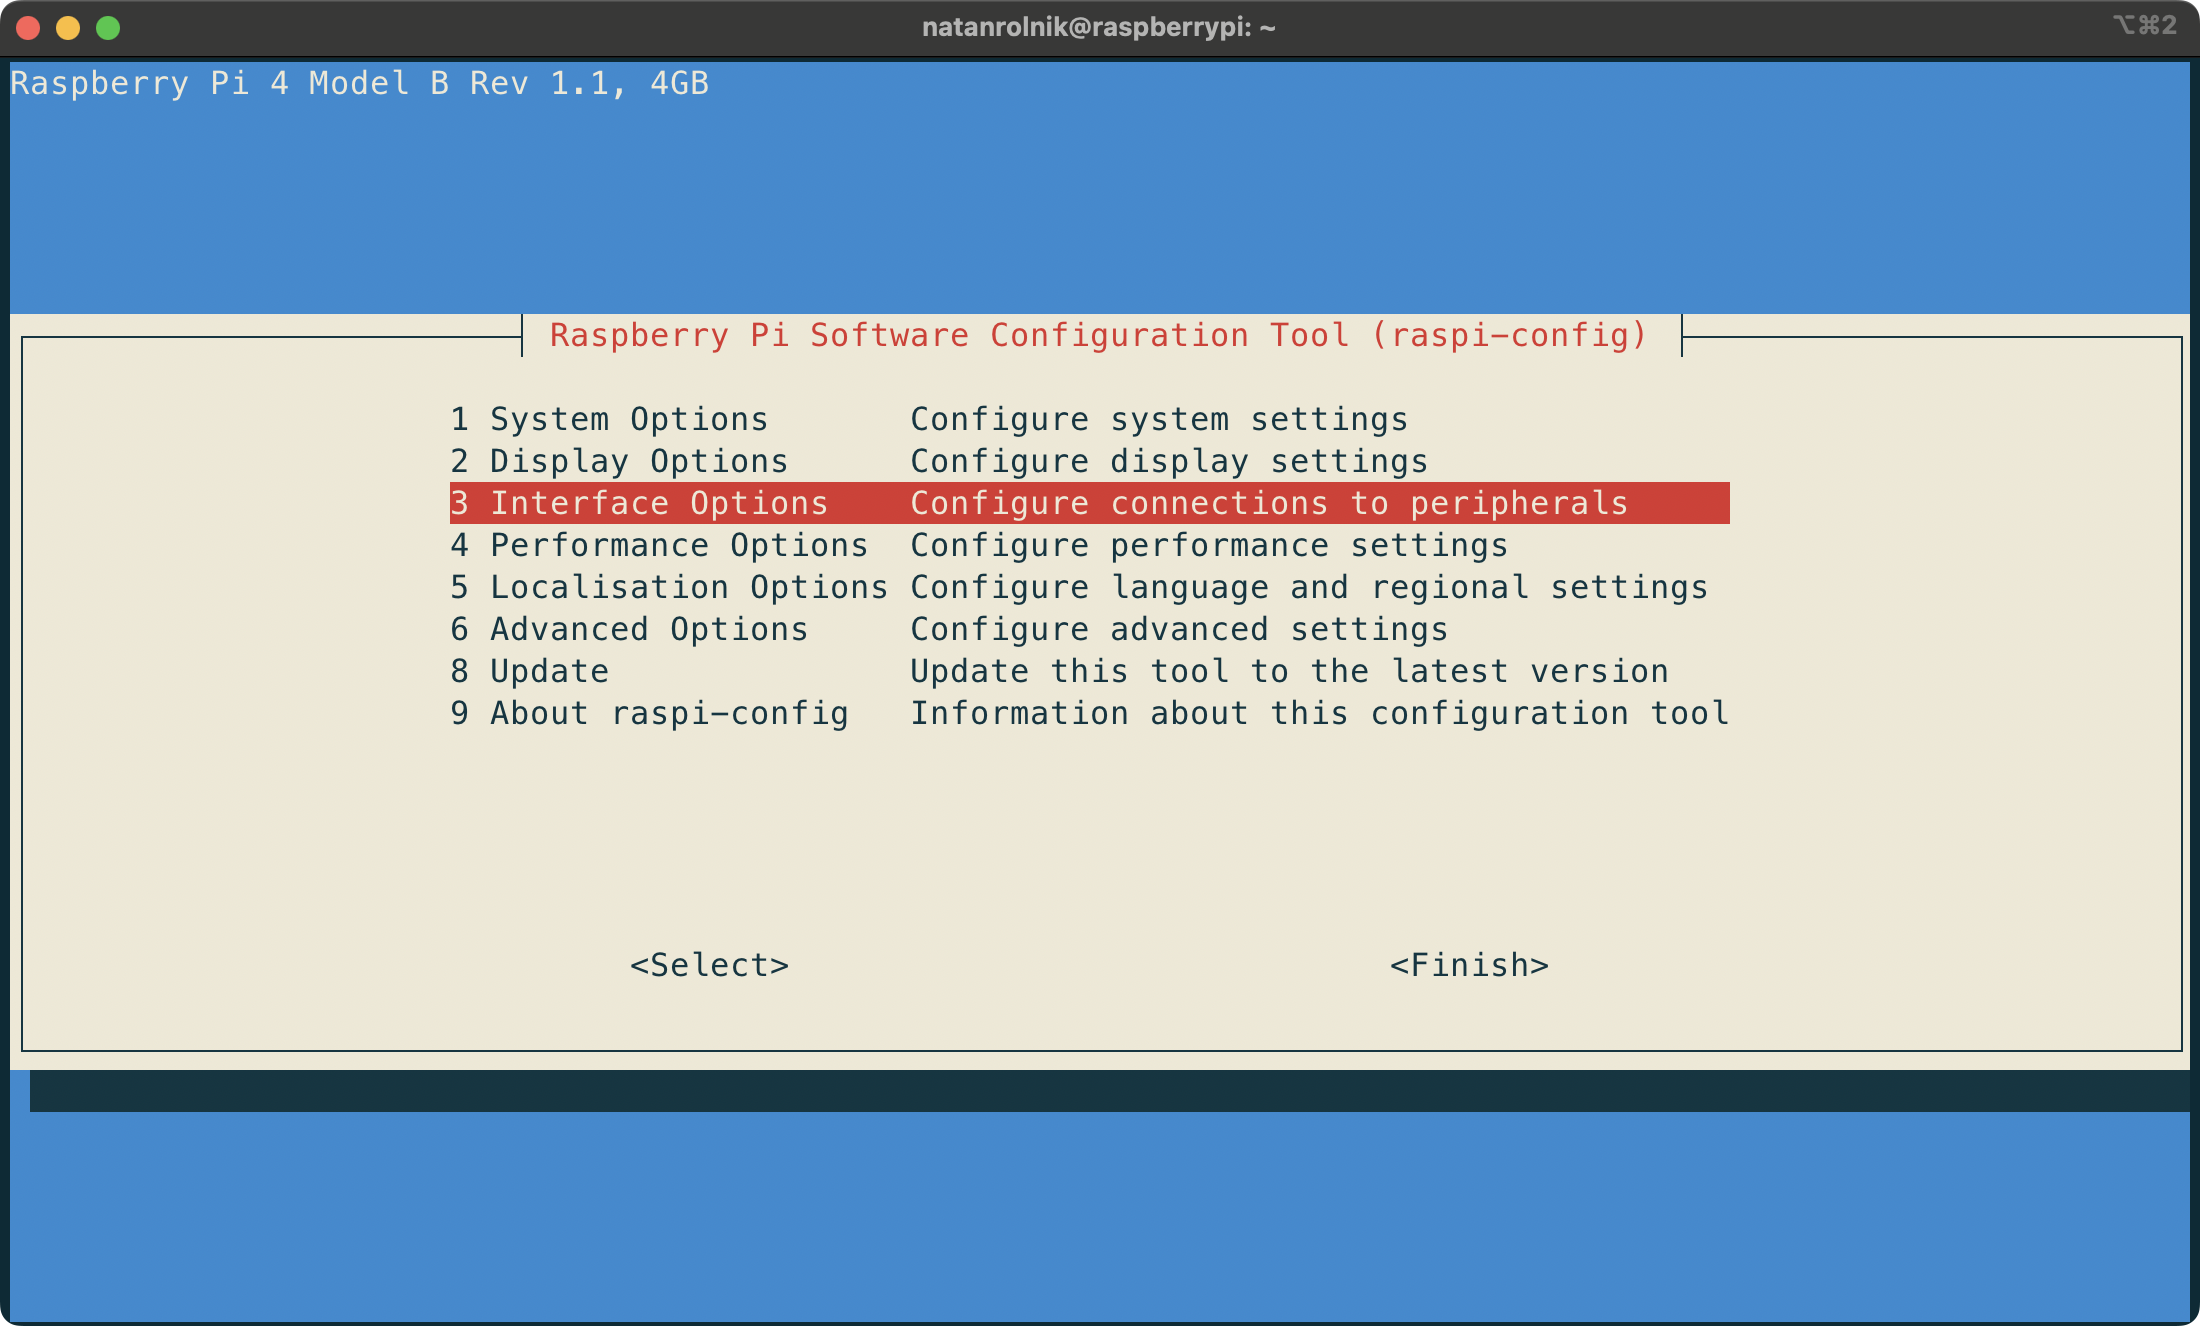
Then, choose VNC:
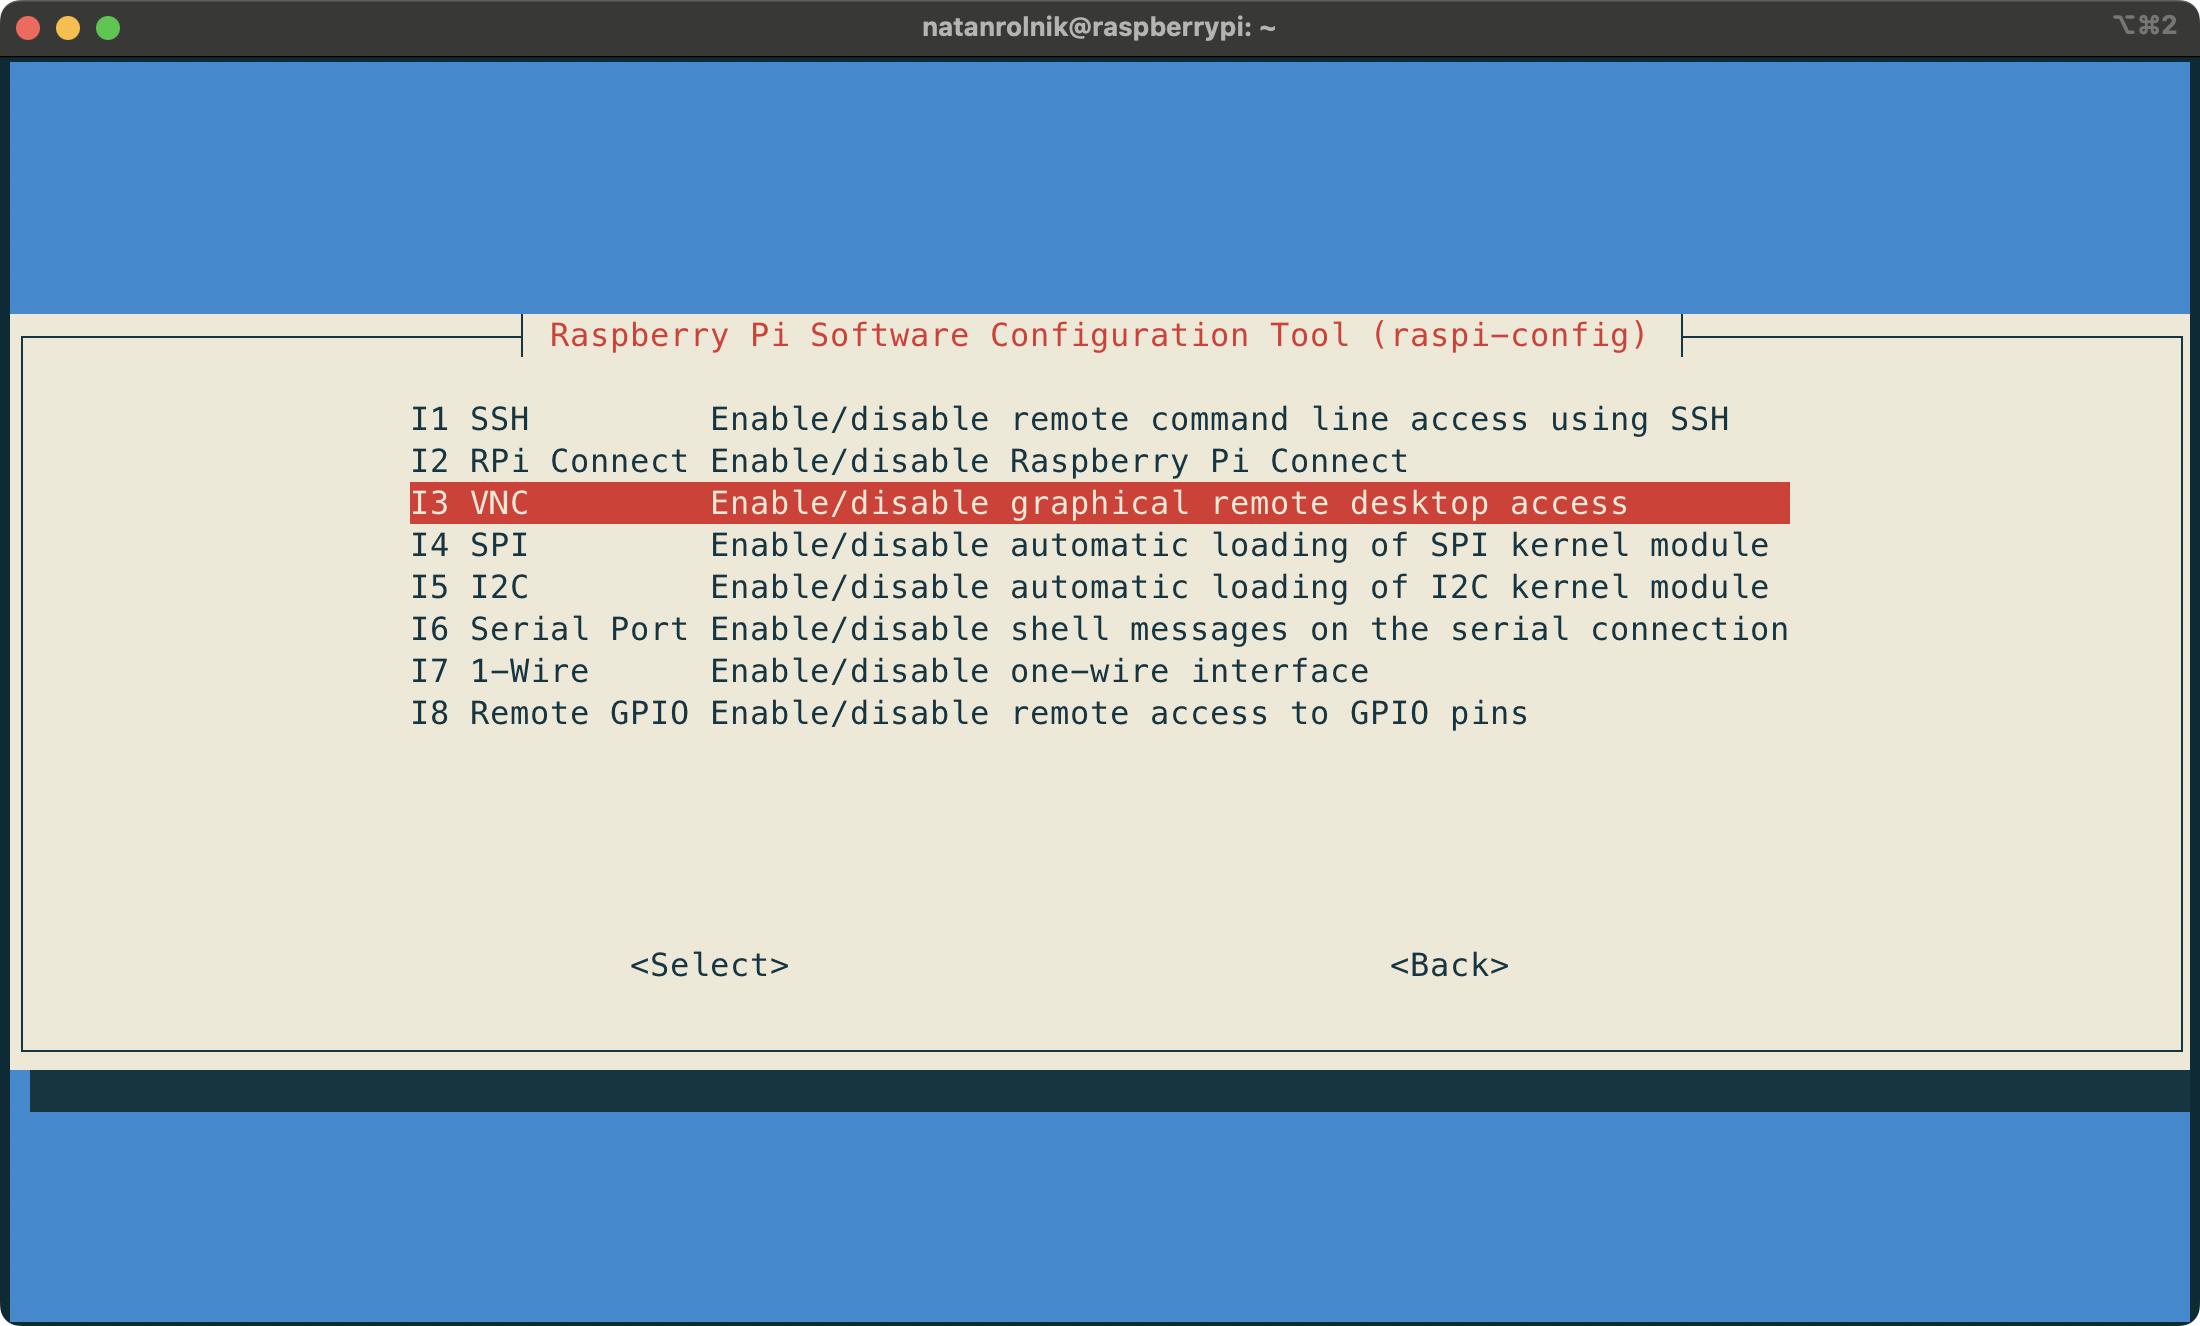
And then select Yes to enable it:
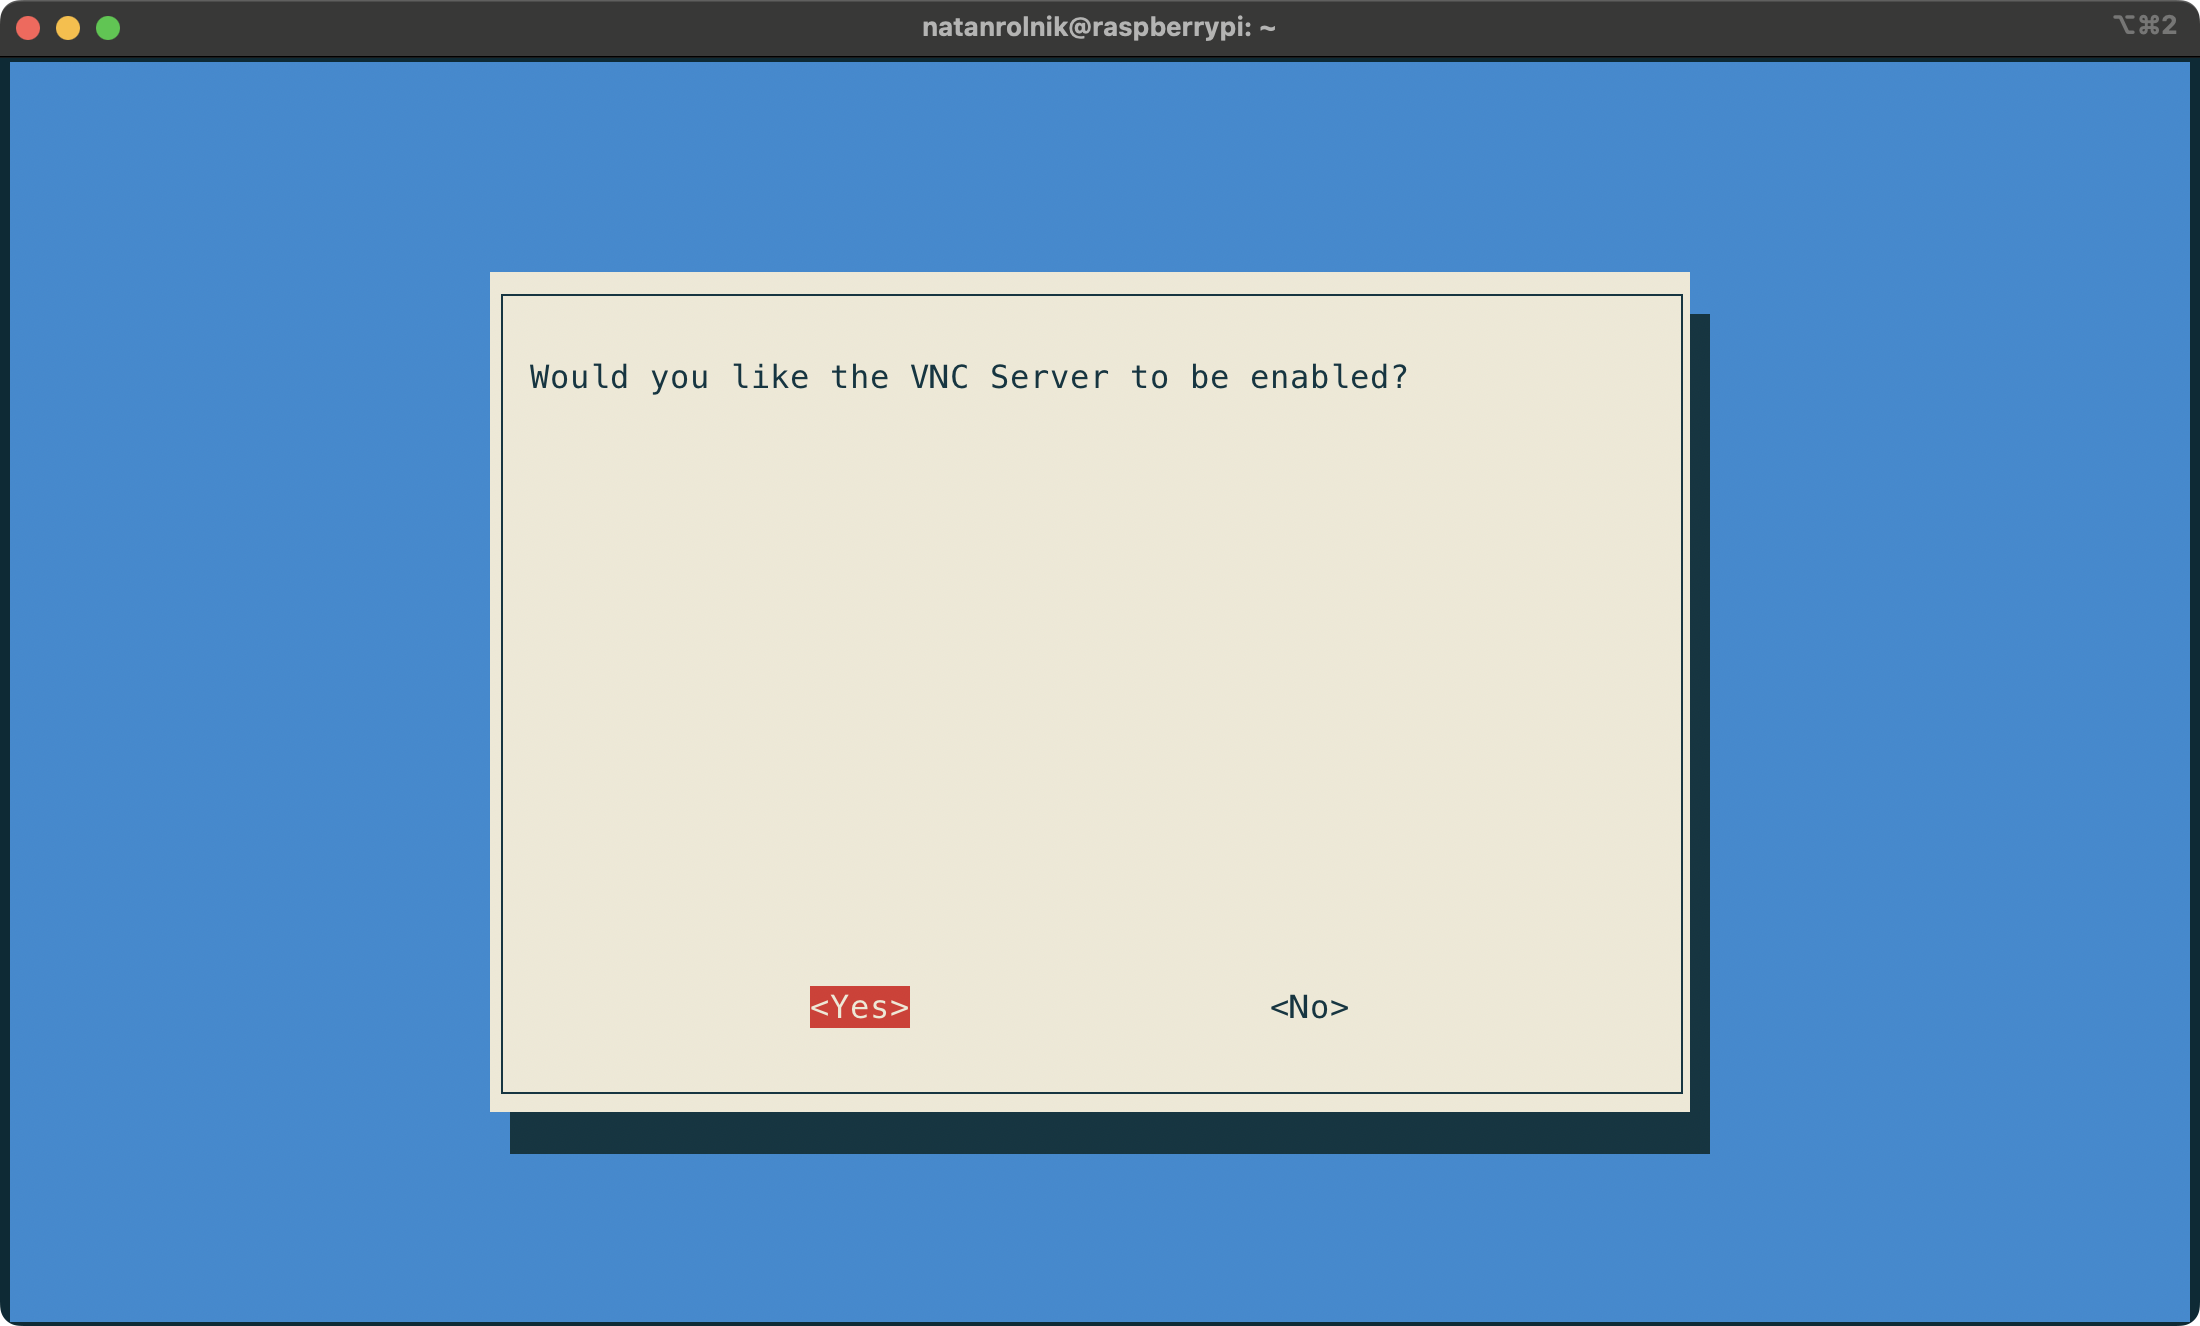
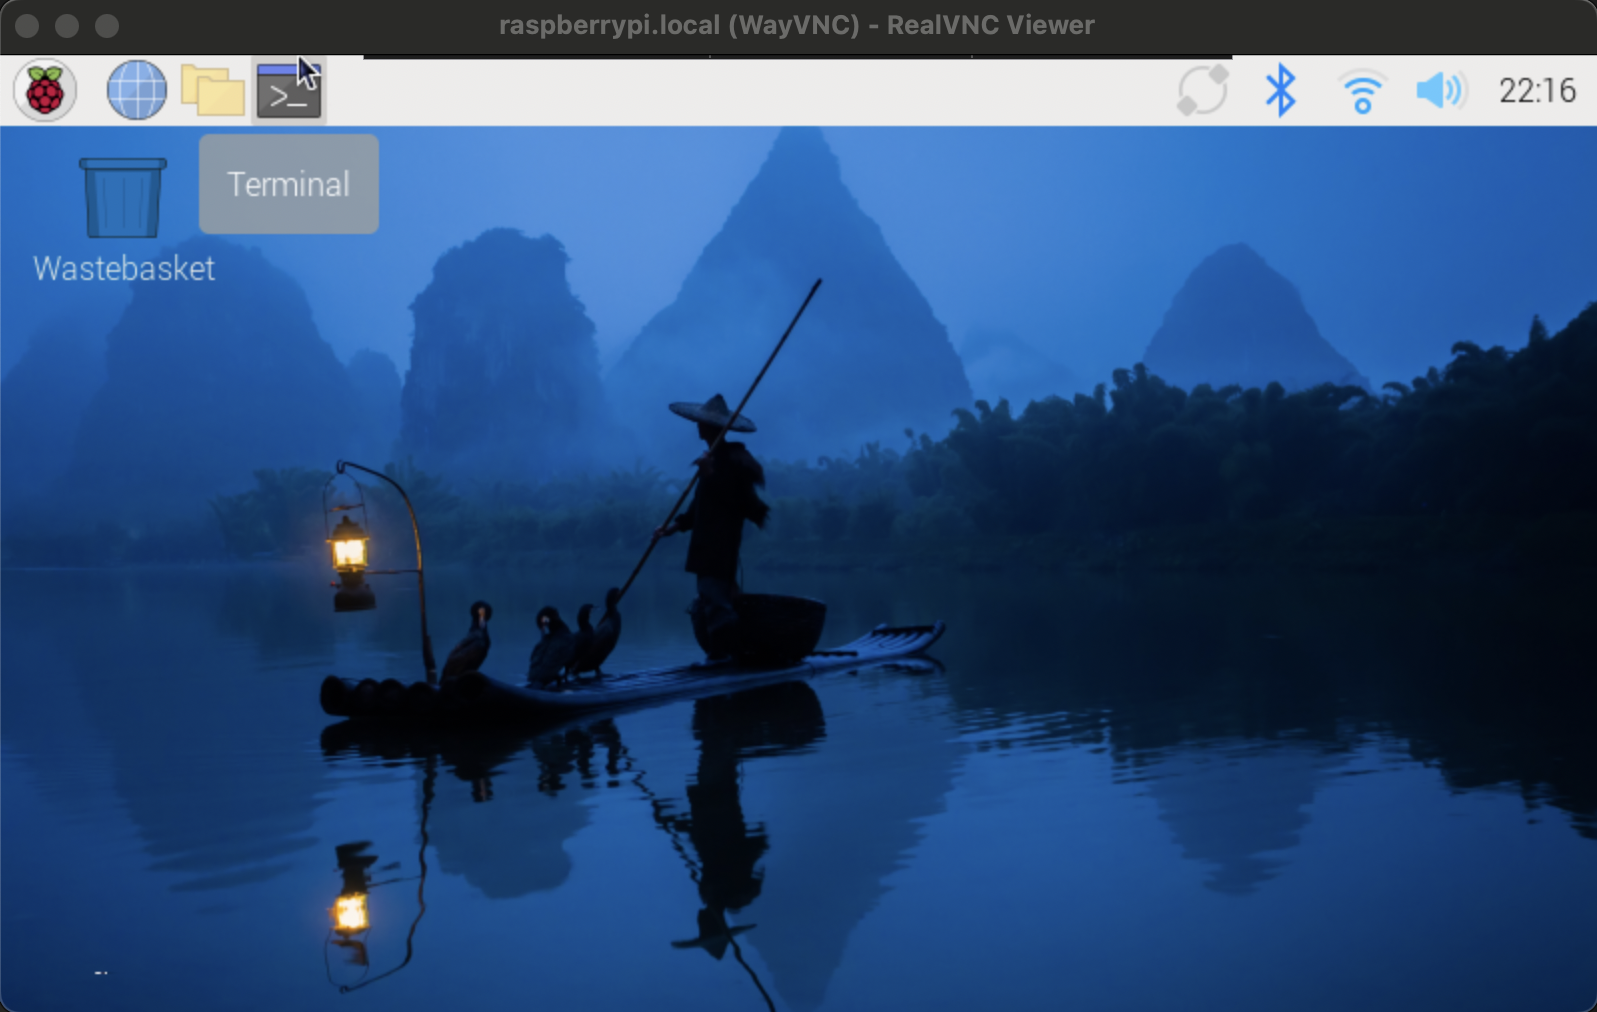
After the Pi is ready to accept connection via VNC, you’ll need the VNC client. Download and install the VNC Viewer app on your Mac. After opening it, type the hostname or the IP address of the Pi in the address bar, hit Enter. Use the same username and password when prompted:
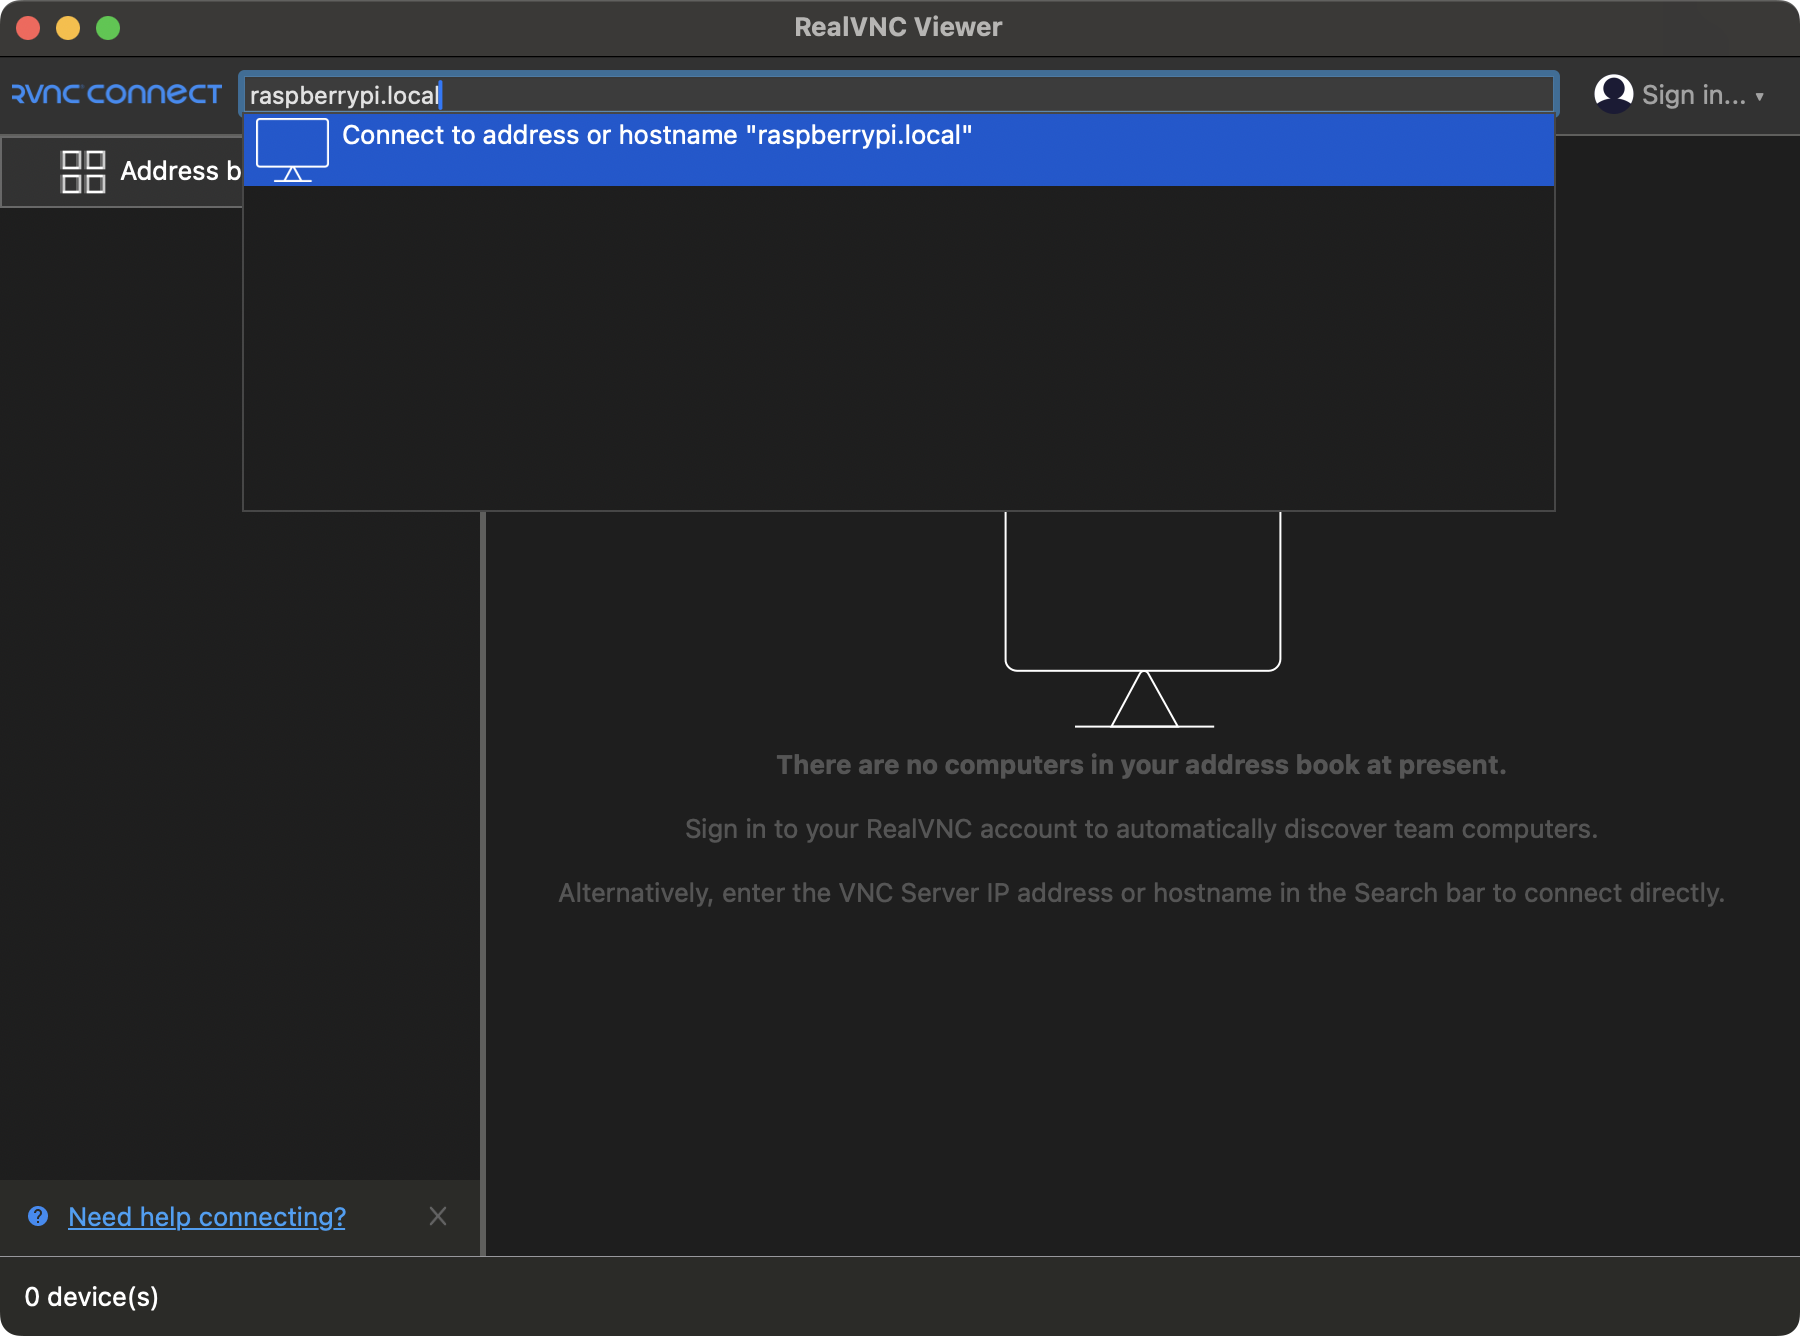

If everything went well, you should see the Raspberry Pi OS desktop:

Building Natively on the Pi
To build Swift files or targets, the Raspberry Pi needs to have Swift installed. A few years ago, to run on 64-bit ARM distributions, one had to compile Swift from source - and this would take hours. Nowadays, thanks to the efforts of the Swift Server Workgroup and the community, Swift has an official ARM64 distribution, which is compatible with the Raspberry Pi 3, 4 and 5 architecture.
Installing Swift with Swiftly
Another great contribution by the SSWG, announced in 2023, is Swiftly: a tool to manage Swift toolchains, that helps installing different versions of Swift on Linux. This is by far the easiest way to install Swift on the Pi.
To install Swiftly, open the Pi’s terminal (or connect via SSH and do it from your Mac’s terminal) and run the following command:
curl -L https://swiftlang.github.io/swiftly/swiftly-install.sh | bashThis will install the swiftly binary. After that, it will ask you to finalize the installation by running the following command, which will ensure that the swiftly command can be found and executed from anywhere in the system:
. $HOME/.local/share/swiftly/env.shNow you can install Swift with the following command:
swiftly install latestWhen being asked to select the OS, choose Ubuntu 22.04, and proceed with the default installation in the next step.
At the time of writing this post, the latest version is Swift 6.0.3. Its download size is 735.9 MB, so it might take a few moments to download depending on your internet connection. You might encounter the following error:
Error: stream ended at an unexpected timeIf that’s the case, retry the install command. After the download is complete, and the fingerprint of the file is verified, you should see the following message upon completion:
Extracting toolchain...
Set the active toolchain to Swift 6.0.3
Swift 6.0.3 installed successfully!
Now your Raspberry Pi is ready to build Swift files or applications!
Building a Single Swift File
To test a simple Swift file, create a new file called hello.swift, with just a print statement:
echo "print("Hello from Swift on the Pi")" > hello.swiftUse the run command to execute it:
swift run hello.swiftIf all goes well, you should see the print statement!
You can also use the nano editor to create a file with the @main entrypoint:
nano test-main.swiftAnd then add a struct with a static main function:
import Foundation

@main
struct TestMain {
    static func main() {
        print("Hello from main function")
    }
}
To compile it as an executable, you can use the compiler directly via swiftc, and use the -parse-as-library flag, to treat the file as a library and not a script.
swiftc -parse-as-library test-main.swiftAnd then run it:
./test-mainThe print message upon running the executable confirms that you can run files with a @main entrypoint - without the need to have a Package.swift file.
Building a Swift Package
Building a Swift package is not much different. For this example, we’ll build the executable tree.swift, from the previous article series. We start by cloning the repository.
git clone https://github.com/swifttoolkit/tree.swift tree-swiftThen, after navigating to the repository, with swift build will build the executable, and also show the path to the produced binary when the --show-bin-path flag is passed:
cd tree-swift
swift build -c release
swift build -c release --show-bin-path
This might take more time than usual, as the Pi is not the fastest machine, compared to a Mac that you might be used to. After the build is complete, copy the binary to the current directory, and run it:
cd ..
cp tree-swift/.build/aarch64-unknown-linux-gnu/release/tree-swift ./tree-swift-bin
./tree-swift-bin
And there you go! You can see the output of the current directory, and the subdirectories:
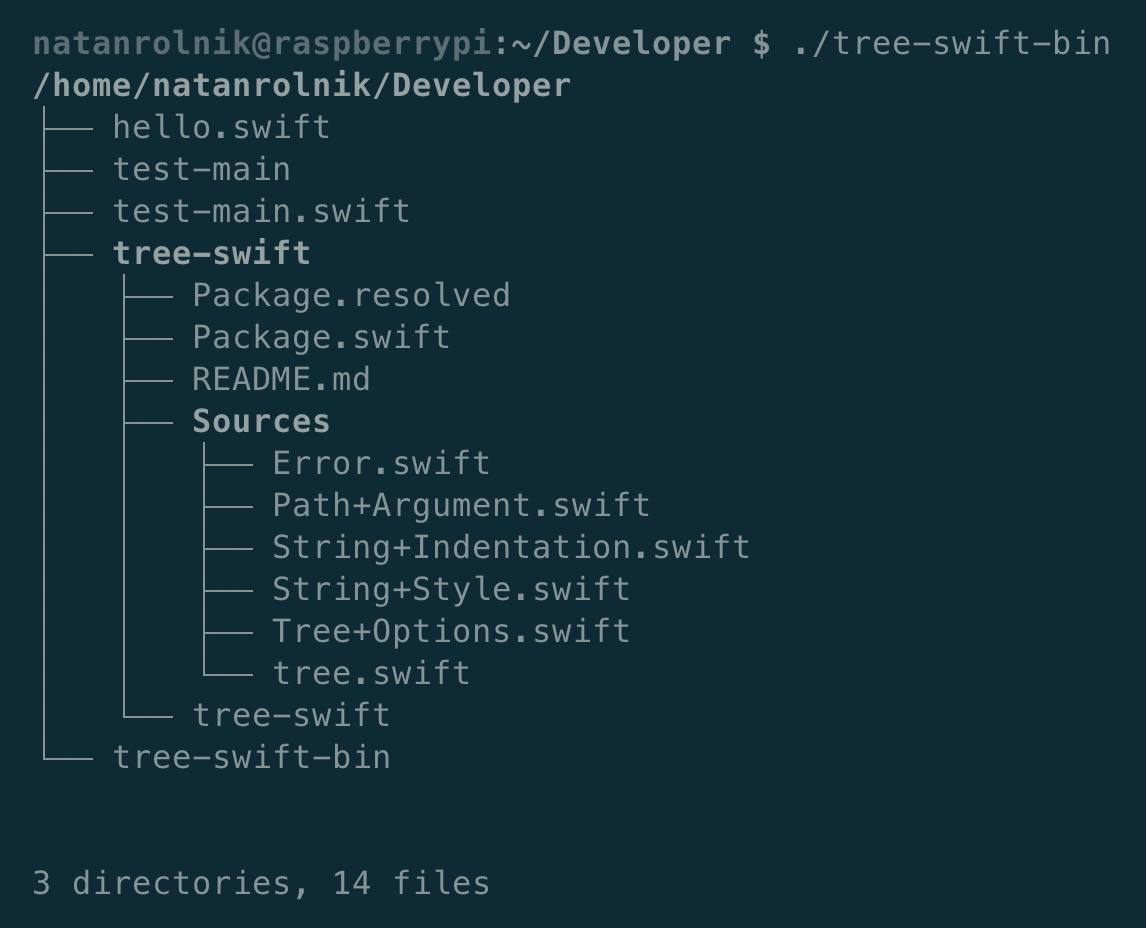

As you noticed, building even a small Swift package on the Pi takes a long time due to its hardware limitations. Wouldn’t it be great if you could compile the code on the Mac, and run it on the Pi, even if they run different operating systems?
Cross Compilation
Starting with Swift 5.9, Swift introduced an experimental feature: allowing the compilation of Swift code from a Mac to Linux, without the need to use a Docker container. On Swift 6, it’s no longer experimental!
Generating the SDK
Now back to the Mac.
To do cross compilation, you’ll need to install the Swift SDK Generator tool, and then use it to generate the SDK for the Raspberry Pi architecture. After cloning the repository, run the following command in its root directory to generate the SDK:
swift run swift-sdk-generator make-linux-sdk --target aarch64-unknown-linux-gnu --host-toolchainThis command will generate a Swift SDK bundle for Linux. Use the --target option to pass what is called a triple: an identifier compounded by the architecture, the vendor of the machine, and the operating system. For the Raspberry Pi, the triple is aarch64-unknown-linux-gnu. Use the --host-toolchain flag to use the host (macOS) toolchain in the Swift SDK.
This command also might take a while, as it downloads toolchain packages from swift.org. Once it finishes, it will create a directory called Bundles in the current directory, and print it out with the path to the generated bundle. Use this path to tell Swift to use this SDK, with the following command:
swift sdk install Bundles/6.0.3-RELEASE_ubuntu_jammy_aarch64.artifactbundleBuilding a Vapor App
For the sake of this example, we’ll build a sample Vapor application, created with the Vapor toolbox. In the root of the project, you can build the Vapor app for the Raspberry Pi with the following command:
swift build --product App -c release --triple aarch64-unknown-linux-gnu --swift-sdk 6.0.3-RELEASE_ubuntu_jammy_aarch64 --static-swift-stdlibNotice all the flags used here:
- Compile the App product (the Vapor application target) in release mode
- Use the
aarch64-unknown-linux-gnutriple, compatible with the Raspberry Pi - Use the Swift SDK created in the previous step
- Include the static Swift standard library when building the binary, instead of relying on it dynamically when running in the Raspberry Pi.
After build is complete, find the App executable binary in the you can find it in the .build/aarch64-unknown-linux-gnu/release directory, and move it to the Raspberry Pi. This can be done via SSH, using a USB drive, or over the internet: whatever is easier for you.
After moving the binary from the Mac, back to the Raspberry Pi terminal.
Before running, add executable permissions to the binary with the chmod command. Notice the usage of the 0.0.0.0 hostname, which allows the app to be accessed from the network.
chmod +x App
./App serve --hostname 0.0.0.0
Now, back to the Mac, you can use curl to check that the app is successfully running:


Explore Further
Wow, that’s a lot we covered here:
- Setting up a Raspberry Pi
- Installing Swift with Swiftly
- Building Swift files and applications natively on the Raspberry Pi
- Generating Swift SDKs for Linux for cross compilation
- Cross compiling Swift applications from a Mac to the Raspberry Pi
Thanks to Jesse L. Zamora for help and guidance in the trickier parts of this post.
You can check the Swiftly and the Swift SDK Generator repository for more information.
If you have any questions, or want to share your thoughts about this article, shoot us a comment at X or Mastodon.
See you at the next post. Have a good one!
